# Aha
## Prerequisites
### Recovery Handling
* space.vars.SITENAME requires a custom field of text type in Aha! system for recovery purpose.
* Field with the internal name **oh \_last \_update** needs to be created for the entity type which is configured in space.vars.SITENAME for the sync purpose and for the entity type which is configured in the default link configuration.
* Refer [Add Custom Fields section](#add-custom-fields) in appendix for details on how to create custom fields.
### User privileges
* Create one user in Aha! that is dedicated for space.vars.SITENAME. This user shouldn't perform any other action from Aha!'s user interface. This user is referred as 'Integration User' in the document.
* Please refer to [Add User](#add-user) section to create a user in Aha!.
* To synchronize entities to and from any systems to Aha!, Integration User must have **Contributor** permission at project level and **Customizations** role \[which needs be selected from project's Administrator roles]. Refer to [Grant permissions to Aha! user](#grant-permissions-to-aha-user) section for step-wise details on how to grant permissions to a Aha! user.
## System Configuration
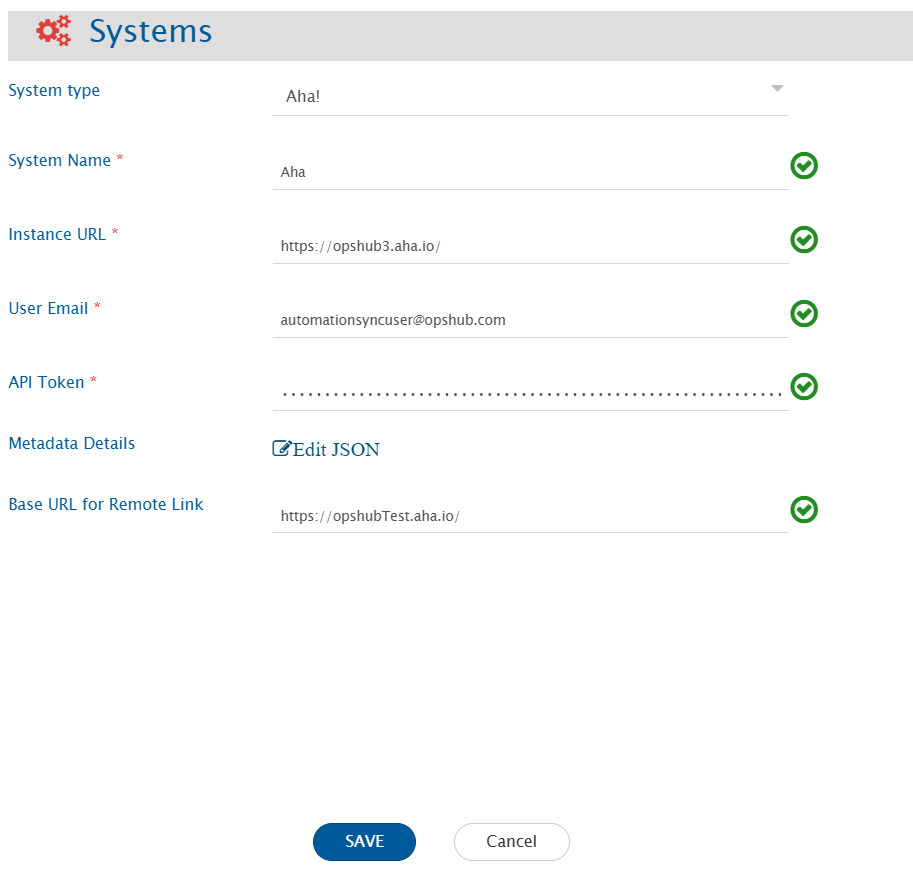
* As you kickstart with the integration, you must first configure Aha! system in space.vars.SITENAME.
* Click [System Configuration](https://docs.opshub.com/v7.215/integrate/configure-integrations/system-configuration) to learn the step-by-step process to configure a system.
Refer to the following screenshot for reference:
space.vars.SITENAME, for the sync of Parking lots, the Release entity needs to be seleted at mapping level {as Parking lots are considered as Release by space.vars.SITENAME }.
### Comments Configuration
* Aha! as source system:
* If comments are mapped in Mapping Configuration, then all the comments will be synchronized to target system. Additionally, the attachments & inline images from the comment will sync to the target system based on its attachment behaviour. For example, if the target conatins the comment with attachment functionality, then attachment will sync to attachment section and the reference to that attachment will be added inside the comment.
* Aha! as target system:
* If comments are mapped in Mapping Configuration, then comments will be synced to Aha! system. Here, the inline images and attachments will be synced to Aha! description field and reference to those attachements will be added in the comment.
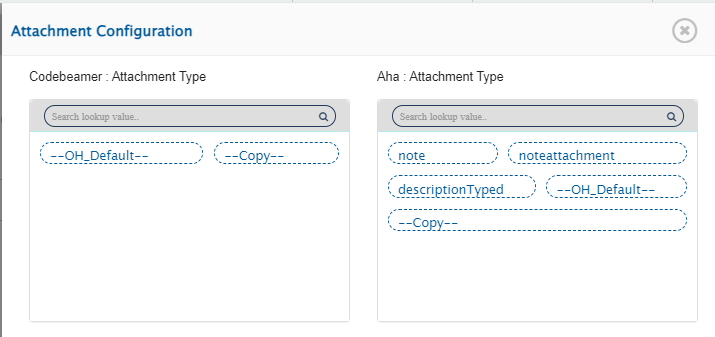
### Attachments Configuration
* Each Rich Text type field supports attchements in Aha!.
* Aha! as source system:
* Attachments from all rich text and attachment type fields will sync to the target system.
* Aha! as target system:
* Attachment mapping can be configured to decide the field of Aha! to which the attachment needs to be synced.
* If only attachment mapping toggle is enabled but the attachment type mapping is not configured, then attachment will sync to description field of Aha! as a part of default attachment behavior sync.
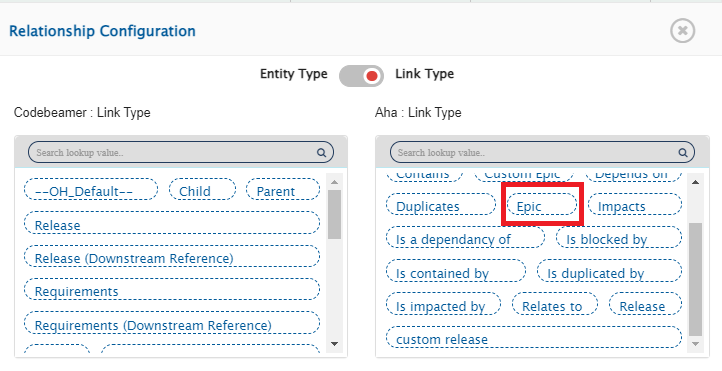
### Relationship Configuration
In Aha!, Record links and Reference fields will be supported as relationships.
#### Mandatory Links
* For Feature and Epic type of entities, the Release is a mandatory relationship linkage as feature and epic can only be created inside the release/parking lot.
* For Requirement type of entities, Feature is a mandatory relationship linkage as requirements can only be created inside the feature.
* For To-do type of entities, the Parent is a mandatory relationship linkage as we support the creation of a to-do entity inside the other entity only. Here, the parent entity can be any other entity.
### Reference Fields
* Reference fields are the fields that refer to some other Aha! entity we support.
* Reference fields \[System/Custom fields] will be synchronized through relationships. For references, the names of the Reference fields will be shown in link type mapping of the Relationship Configuration, as shown in the screenshot below:
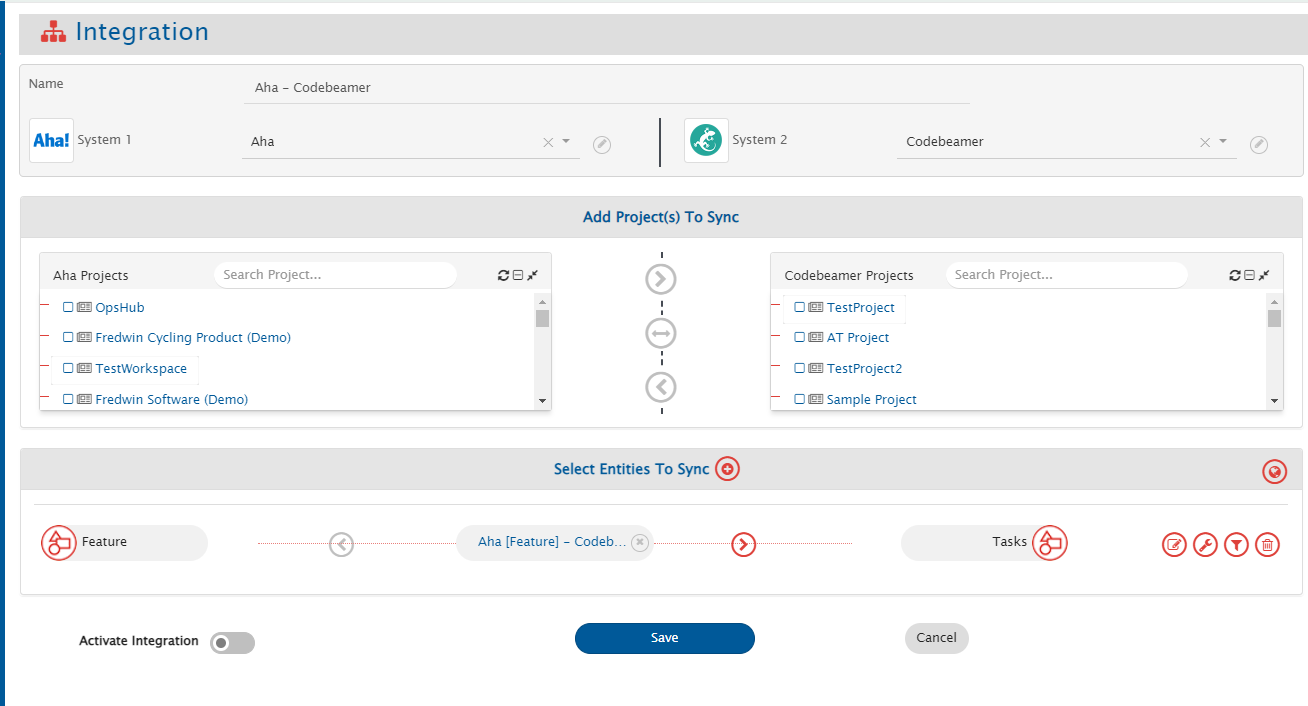
## Integration Configuration
Set a time to synchronize data between Aha! and the other system to be integrated. Also, define parameters and conditions (if any) for integration. Refer to [Integration Configuration](https://docs.opshub.com/v7.215/integrate/configure-integrations/integration-configuration) to learn the step-by-step process to configure the integration between two systems. Refer to the screenshot given below:
In Aha!, the entity type selection in integration configuration depends on the project selection. For more details, please refer to [Project Selection](#project-selection) section.
### Criteria Configuration
If the user wants to specify conditions for synchronizing an entity from Aha! as source system to the other system, the criteria must be configured. Navigate to Criteria Configuration section on [Integration Configuration](https://docs.opshub.com/v7.215/integrate/configure-integrations/integration-configuration) page to learn in detail about Criteria Configuration. Set the **Query** as per Aha! encoded query format. Criteria is only applicable to given four fields. Given below are the sample snippets of how the Aha! queries can be used as criteria query in space.vars.SITENAME:
**Criteria samples:**
| **Field Type** | **Criteria Description** | **Criteria snippet** |
| ------------------------ | --------------------------------------------------------------------- | ----------------------------------------------------------------------------------------------------------------------------------------------------------------------------------------------------------------- |
| `q` | Synchronize all entities named as 'test feature' | q=test%20feature |
| `updated_since` | Synchronize all entities updated after 10 March 2021 | updated\_since=2021-03-10T00%3A00%3A00.000Z
Format: yyyy-MM-dd'T'HH:mm:ss.SSS'Z'
|
| `tag` | Synchronize all entities associated with the tag 'need review' | tag=need%20review |
| `assigned_to_user` | Synchronize all entities assigned to user 'ABC' | Filter can be applied on User ID or User email.
For an example, assigned\_to\_user=7163902316942030700 /assigned\_to\_user=email%40opshub.com
Here, 7163902316942030700 is the id of the user 'ABC'.
|
| `updated_since` + `name` | Synchronize entities named 'test r \&d' and updated after 10 Mar 2021 | updated \_since=2021-03-10T00%3A00%3A00.000Z \&q=test%20r%26d |
### Target LookUp Configuration
* Provide Query in Target Search Query field such that it is possible to search the entity in the Aha! as the target system. In the target search query field, the user can provide a placeholder for the source system's field value in the '@'
* Go to **Search in Target Before Sync** section on [Integration Configuration](https://docs.opshub.com/v7.215/integrate/configure-integrations/integration-configuration) page to learn in detail about how to configure Target LookUp.
* Overall, Target LookUp Query is similar to [Criteria Configuration](#criteria-configuration), except that the value part contains a field name with '@' instead of static value.
**Target LookUp query samples:**
| **Field Type** | **Target lookup usecase** | **Snippet** |
| -------------- | --------------------------------------------------------------- | -------------------------- |
| `q` | Target lookup on entity having source entity's id in name field | q='@source \_system \_id@' |
## Known Behaviour
* From Aha! UI, issue type can be changed for entity. Currently, such conversions will create a new entity in the target and the previous one will be orphaned.
* From Aha! UI, the entity can be deleted. However, for Aha! as the source system, the deleted entity will not sync by space.vars.SITENAME. The corresponding target entity will remain orphan in target system on Aha! entity deletion. Also, Aha! entity deletion is not supported by space.vars.SITENAME, when Aha! is the target system.
* To update the "Progress" field through synchronization, the progress source must be set to "manual" (from Aha! UI or field mapping of space.vars.SITENAME) due to Aha! API behavior.
* Goals and Initiative System fields will be available as lookup fields in the field mapping, even though they are not available in Aha! Develop UI.
* **The above fields are available in Aha! Develop UI when the Aha! Develop instance is combined with Aha! Roadmap.**
* Hierarchy sync is not supported. Hence, the synchronization of ranking the requirements and to-dos will not be supported.
### Project Selection
* For Aha! system, users can organize their data at different types of workspaces, i.e., Project, Products or Teams. Different entities can reside in different workspaces, for e.g., the Feature can belong to the Product while Activity can belong to the Project.
### API Rate Limitation in Aha!
* Aha! has limitation on API access per minute for a single user. Due to this, space.vars.SITENAME can access Aha! API within a limit. When the limit exceeds, the Aha! API stops responding for certain amount of time, and no API calls can be done by space.vars.SITENAME during that time until Aha! resets the limit for that user.
* **Up to 300 requests per minute and 20 requets per second are allowed in Aha!.**
* To address this issue, wait time (given by Aha! API) will be considered for entity synchronization. Thus, there might be some delay in synchronization in case of API rate limit issue.
## Known Limitations
* Below Custom fields are not supported by space.vars.SITENAME:
* Score card field
* Table field
* Worksheet field
* Limitations due to the lack of Aha! API:
* Entities will be synced without history.
* Metadata is not available for the system fields. So, we are providing static metadata in the system itself. Here, the user can change the display name of the entity. User can provide the entity name using the JSON input, and if any user doesn't provide any JSON input, an inbuild entity display name will be considered.
* In Aha! Develop instance, for **Epic & Feature** type of entities, **Workspace** field is not available for synchronization.
* In Aha! Develop instance, for **Requirement** type of entity, **Initial estimate, Detailed estimate & Actual effort** fields will not be synced.
* Score field is not supported as it is a complex field and it can be calculated according to different equations.
* State transition is not supported as API doesn't give the infomation about state transitions.
* Attachment field: If Aha! is the target system and the attachment mapping is configured to use field-type attachments, at least one attachment should be present in the corresponding field.
* For Aha! as the target system, the fields below will not unset via space.vars.SITENAME due to Aha!'s API limitation: **Effort, Value, Duration Source, Progress Source, Status, Type, Complete by date (internal), Round date to, Complete by date (external), Presented, and Description.**
* For Comment synchronization, when you add inline image/attachment to comment, the user needs to update one field \[System/Custom field] or needs to add normal text comment to sync the comment with inline image/attachment. **Reason: In Aha!, entity modified time does not get updated with inline image/attachment addition in comment.**
* **To-dos** present at user level will not synced by space.vars.SITENAME. **To-dos** present in other entities can only be synchronized.
### Troubleshooting Guide
If you are getting an **Internal Server Error** with **Status Code: 500**, then you should retry the failures. There is a limitation of the Aha! API that if we perform updates on entities from same project at the same time, deadlocks occur in their database. It can cause the above-mentioned error.
## Appendix
### Add User
1. Login to Aha! using the user with privileges to create a new user.
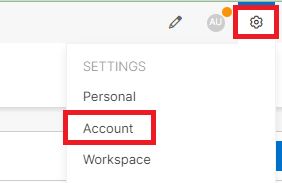
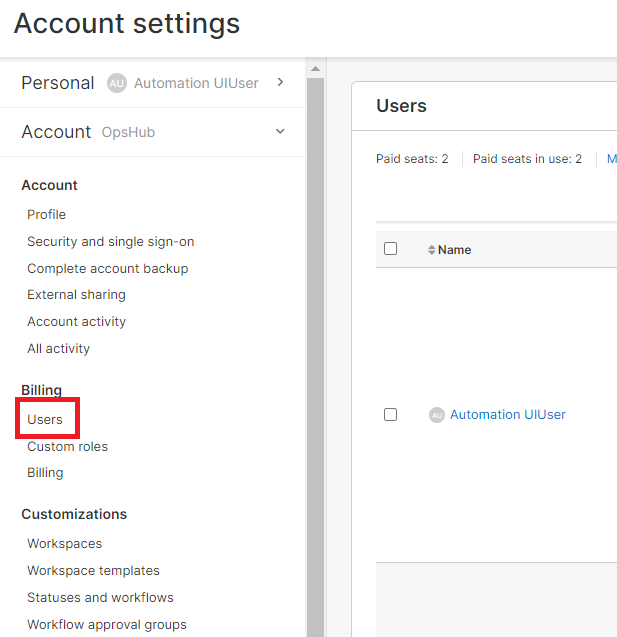
2. Navigate to Settings given at the top right corner and go to Account section.
3 . Navigate to Users
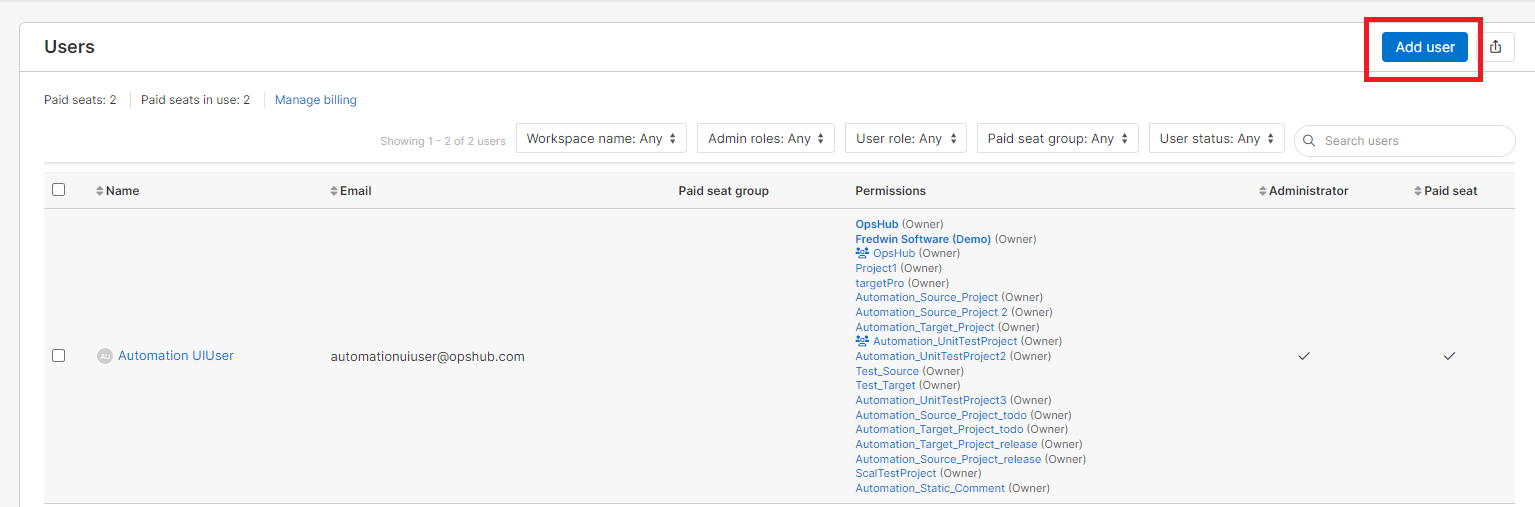
4 . Click on the Add User button given at the top right corner of the users' list.
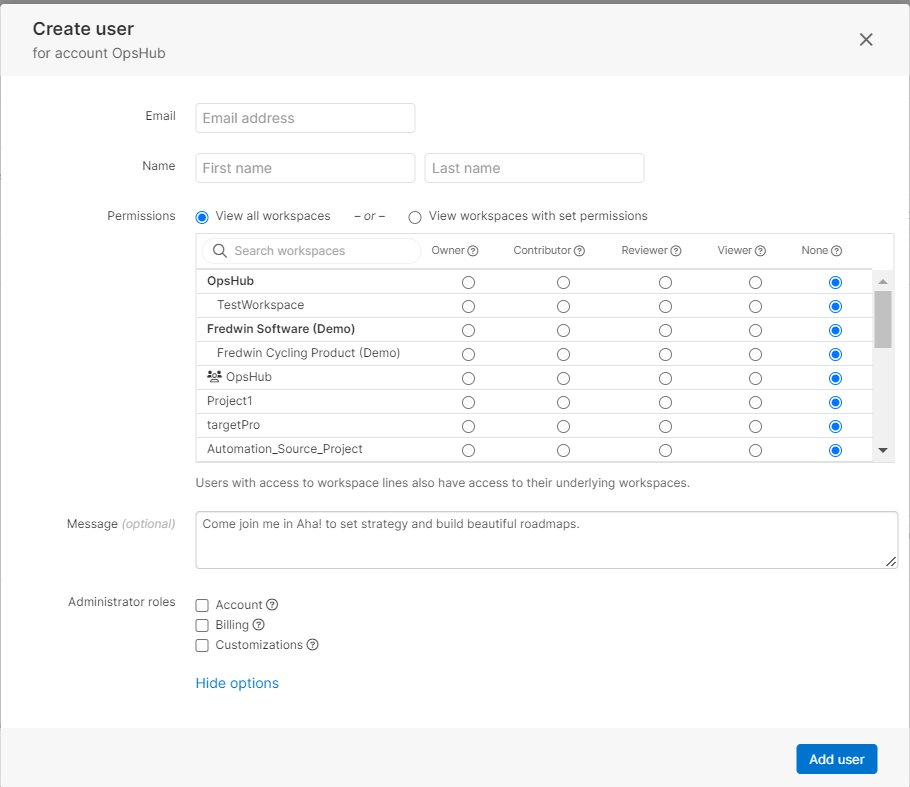
5 . Fill the details regarding the user. For the Administration Role and Permissions for different workspaces, select the roles having permissions mentioned in \[User privileges] (#user-privileges) section.
6 . Save changes
### Grant permissions to Aha! user
1. Login to Aha! using the user with privileges to grant permissions to any user.
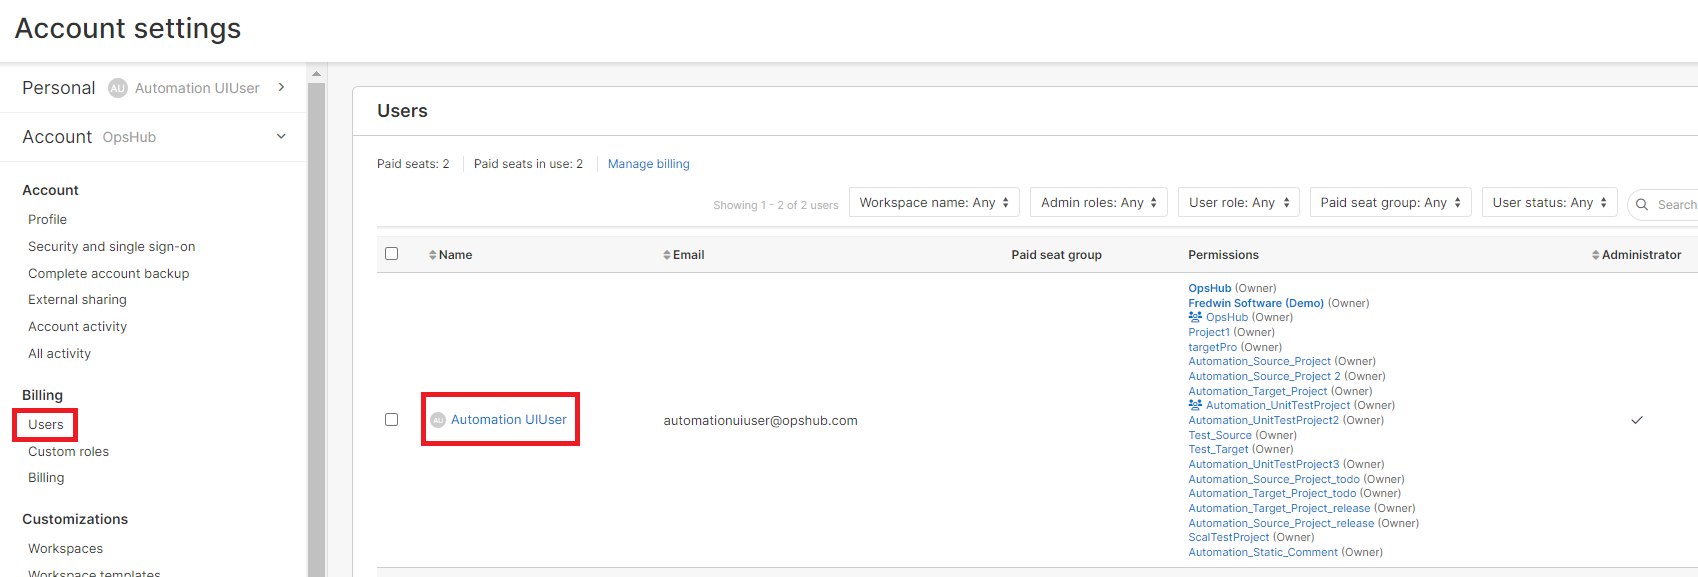
2. Navigate to Settings and go to **Account->Users** section.
3. Navigate to **Users** and select the user for which you want to change the permissions.
4 . Select Administrator roles and Permissions for different workspaces you want to give to integration user.
5 . Save changes
### Add Custom Fields
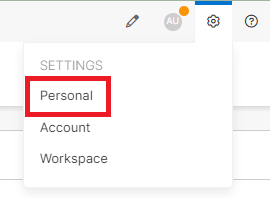
1. Navigate to Settings given at the top right corner and go to Personal section.
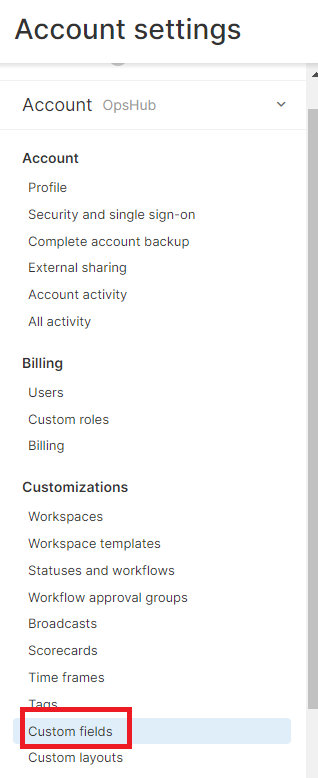
2 . Navigate to Custom fields section.
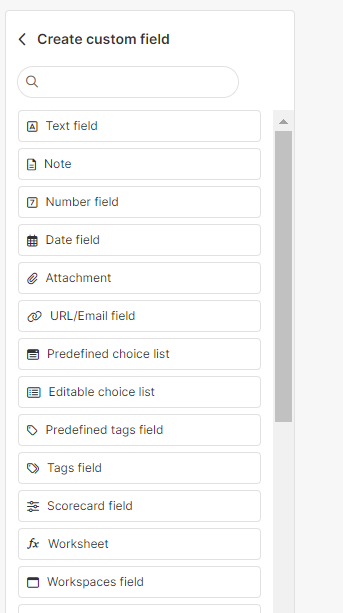
3 . Select the entity for which you want to create the custom field, and click Add custom field.
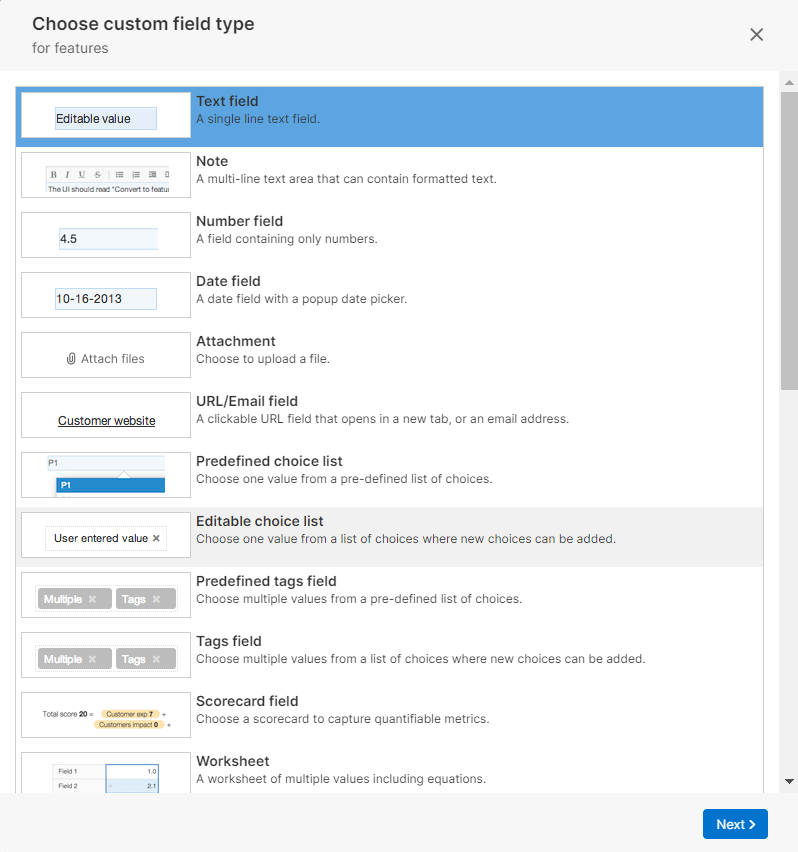
4 . Choose custom field type from the list and click Next.
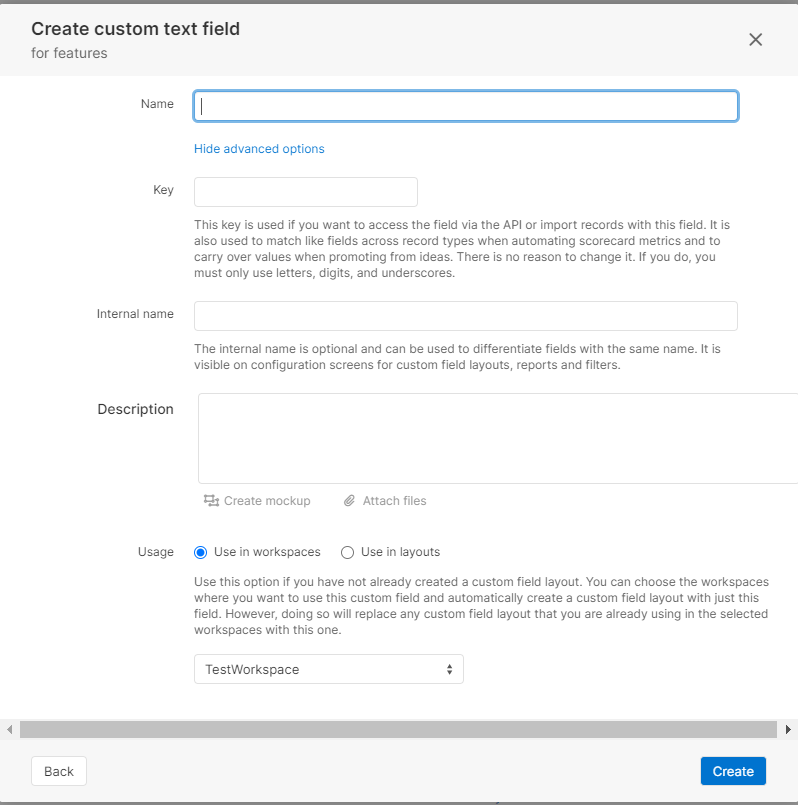
5 . Fill the details for creating the selected custom field.
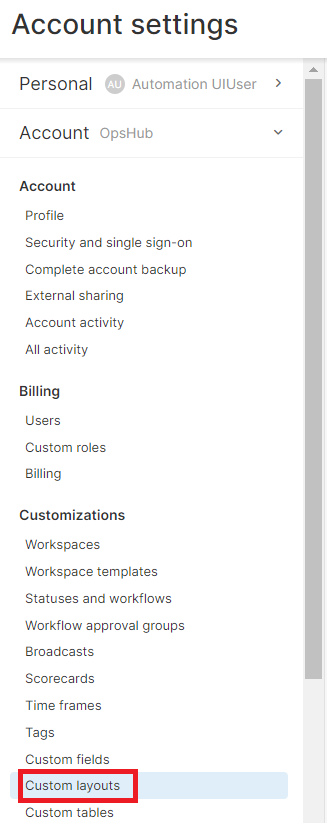
### Add Custom Layout
1. Navigate to Settings given at the top right corner and go to Personal section.
2 . Navigate to Custom layouts section.
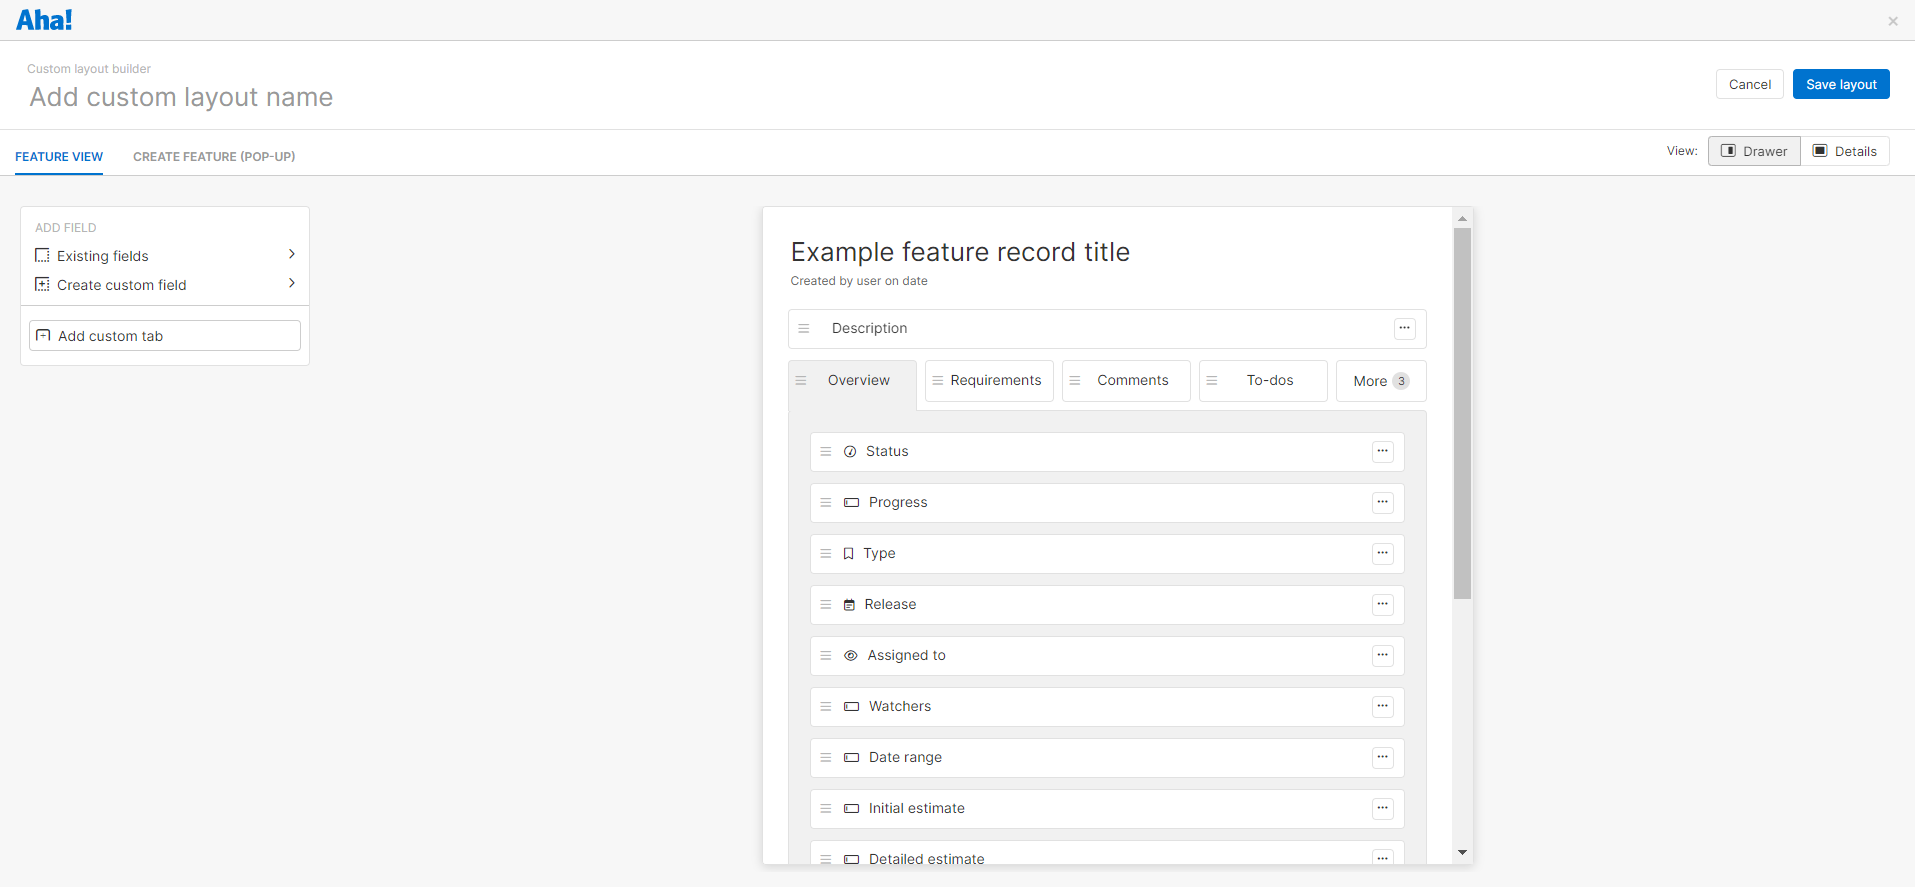
3 . Select the entity for which you want to create the custom layout, and click Add custom layout.
4 . You can choose to create a new custom field or select from the existing custom field from the list.
5 . If you choose to use an existing custom field, you can drag and drop it to the fields list given on the right side.
6 . If you choose to create a custom field, you can drag and drop it to the fields list given on the right side. Fill the details for creating the custom fields.
7 . Give the name to the layout and save it.
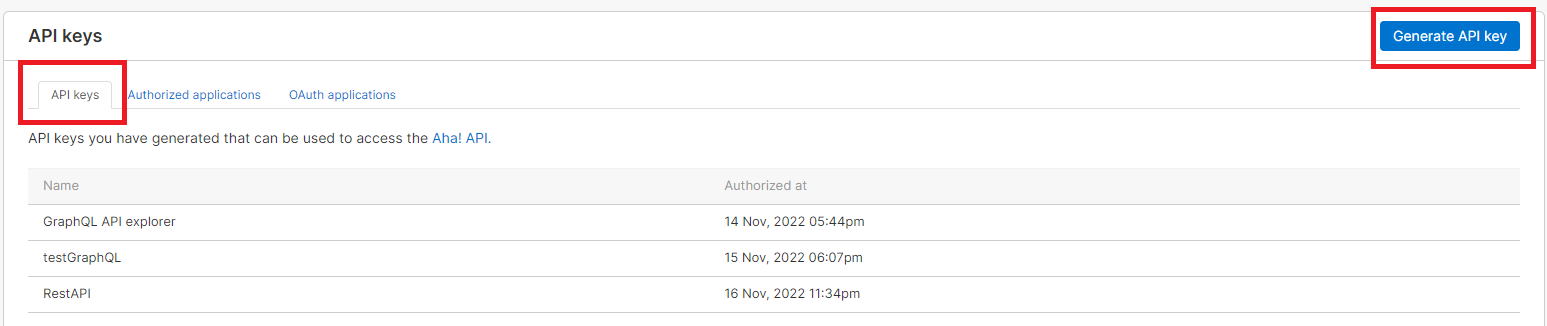
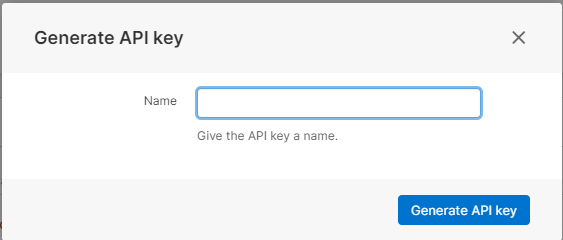
### Steps for generating the API token
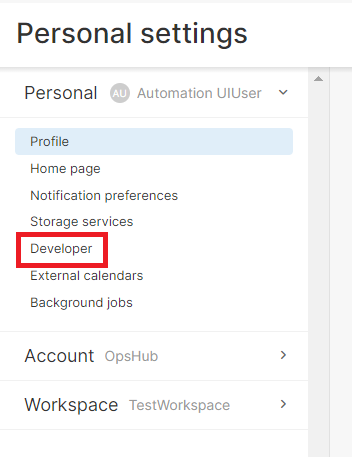
1. Navigate to Settings given at the top right corner and go to Personal section.
2 . Navigate to the Developer section.
3 . In the API keys section, click Generate API key.
4 . Give name to the key and click on Generate API key.
5 . Copy the generated API key and save it for future reference.