# OpenText ALM Quality Center
## Pre-requisites
### User privileges
* Create one user for Micro Focus ALM/QC, dedicated to space.vars.SITENAME. This user should not do any other operations from the Micro Focus ALM/QC's user interface. For creating user, please refer [Add User to Project](https://admhelp.microfocus.com/alm/en/12.60/online_help/Content/Admin/cust_users_add_to_proj.htm).
* Micro Focus ALM/QC user must be an **Active site user** in Micro Focus ALM/QC. If the user is deactive user in Micro Focus ALM/QC, then activate the user. For help on how to activate the user, please refer [Activate the User](#Activate-the-User-as-a-Site-User) in Appendix.
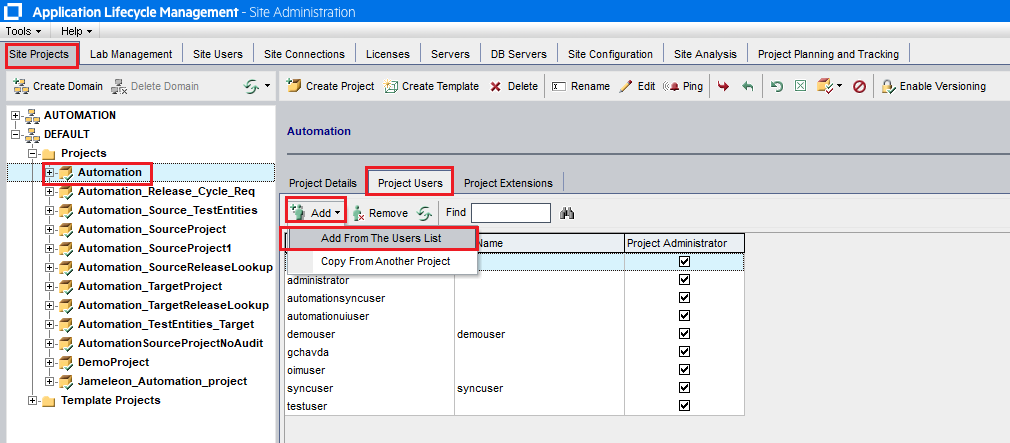
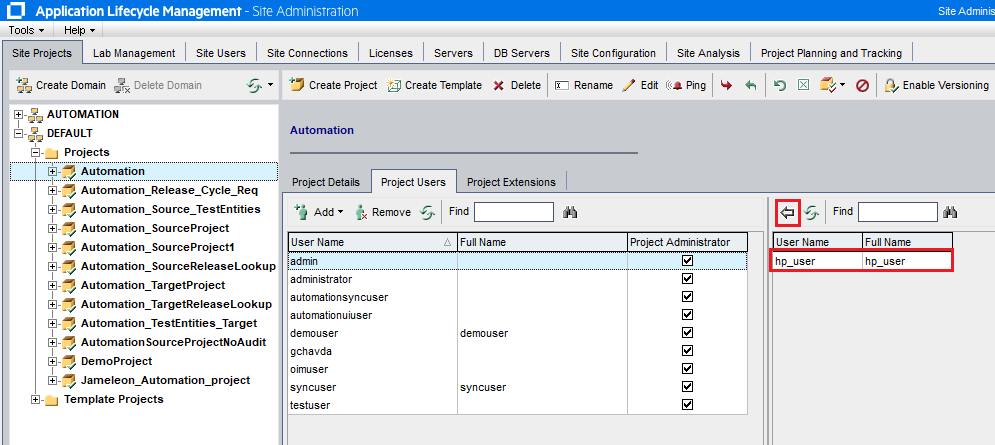
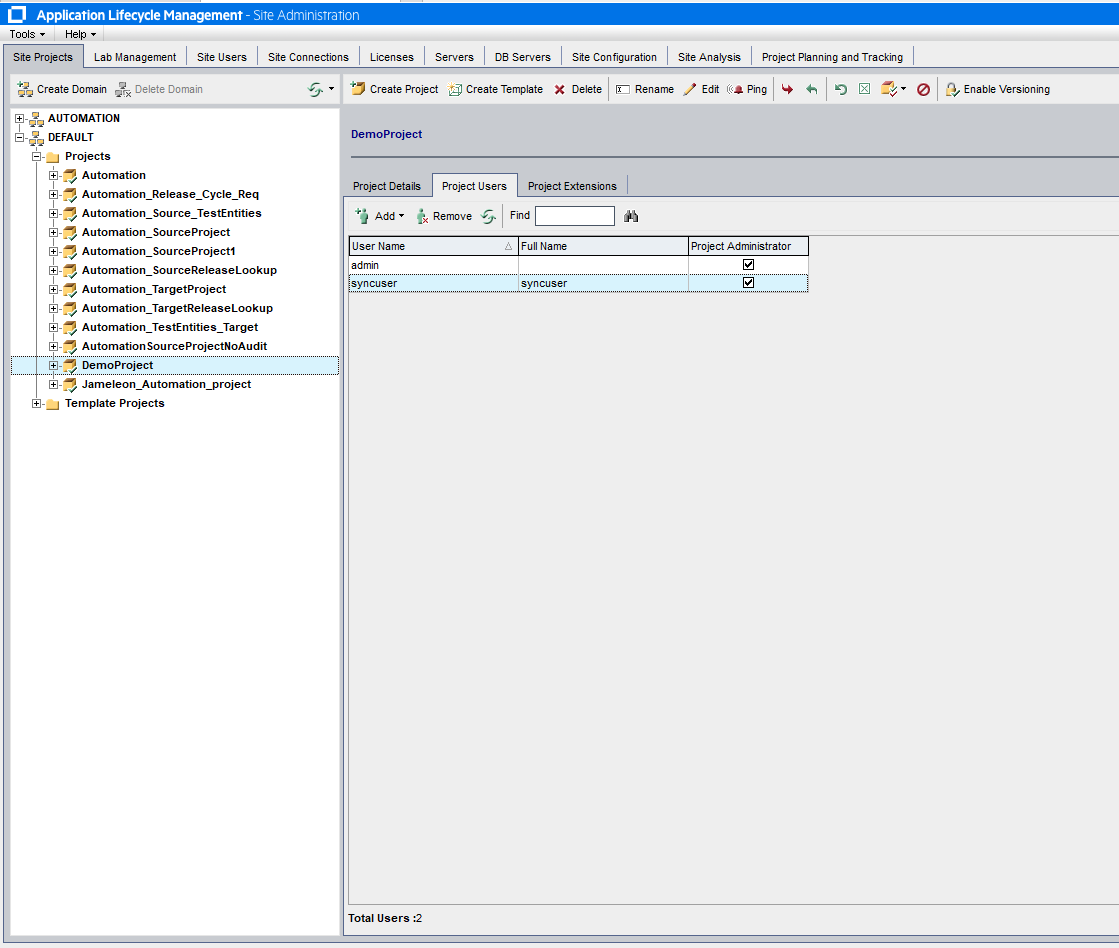
* To use a particular project in Micro Focus ALM/QC, the user must be present as a **Project User** for that project. For help on how to add a project user in the project, please refer [Add project user in project](#Add-project-user-in-project) in Appendix.
* Micro Focus ALM/QC user must have **Project Administrator** rights on the Project that is to be synchronized. For help on how to set the access rights on project, please refer [Add Permissions To Project](#Add-permissions-to-project) in Appendix.
> **Note**: In case your Micro Focus ALM/QC is configured with SSO, then the above mentioned User privileges and permissions are sufficient.
### Database prerequisites
* For Micro Focus ALM/QC Quality Center 10 and 11, supported database types are: MS SQL Server and Oracle.
### System prerequisites
* For OpenText ALM Quality Center version 24.x:
* Add the site parameter **ENABLE\_GET\_LOGOUT\_METHOD** and its value to **Y**. To perform this action, go to `http://IP:PORT/qcbin/webadmin/#/configuration` and click on **Add New Parameter**.
* Reason: Logout user API will not work without this site parameter.

### Proxy configuration
For certain Micro Focus ALM/QC versions, proxy configuration is required only for specific types of data synchronization, such as:
* For version 10.0, 11.0, and 11.5: Required only when design steps or requirement traceability need to be synchronized.
* For version 12.0: Required only when design steps need to be synchronized.
**Required for all versions:**
* To synchronize test set execution.
* To synchronize attachments in cycle entity.
* To read actual values of parameters for different test configurations in test entity.
| **CPU** | Core duo 1.6 Ghz (or higher) or equivalent compatible processor |
| -------------------------------- | ---------------------------------------------------------------------------------------------------------------------------------------------------------------------------------------------------------------------------------------------------------------------------------------- |
| **Memory (RAM)** | 4 GB (recommended) |
| **Operating system (Tested On)** | Windows 7, Windows 10, Windows Server 2008, Windows Server 2012, Windows Server 2016, Windows Server 2019 |
| **Software** | \* Visual C++ 2005 SP1 ATL Security Update Redistributable
\* Microsoft .NET Framework 4.5 (SP1)
\* IIS 7.0 with ASP.NET configured
\* Micro Focus ALM/QC Connectivity Add-in (Download from: http\://\:\/qcbin/addins.html)
|
> **Note**: For Test Set Execution Request integration, the OpsHub ALM/QC Proxy must be configured on a machine on which UFT has been installed.\
> Click here for [Proxy Configuration steps](#Proxy-Configuration-steps).
### Configurations required to copy QTP script
Following additional configurations are required to copy QTP script:
* **Quick Test Professional** and appropriate **QuickTest Professional Add-In** must be installed on the machine on which OpsHub ALM/QC proxy is configured. To download QuickTest Professional Add-In, please follow [this link](https://hpln.hp.com/page/quicktest-professional-add).
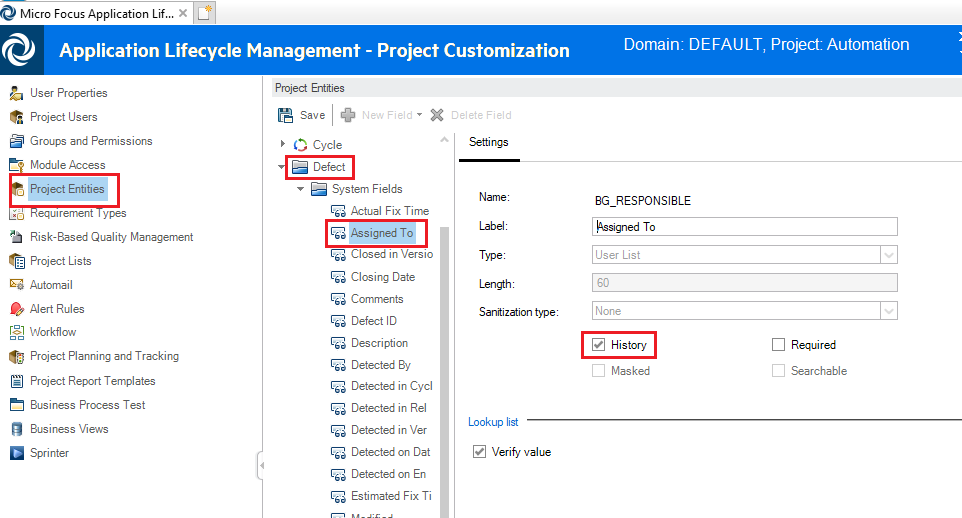
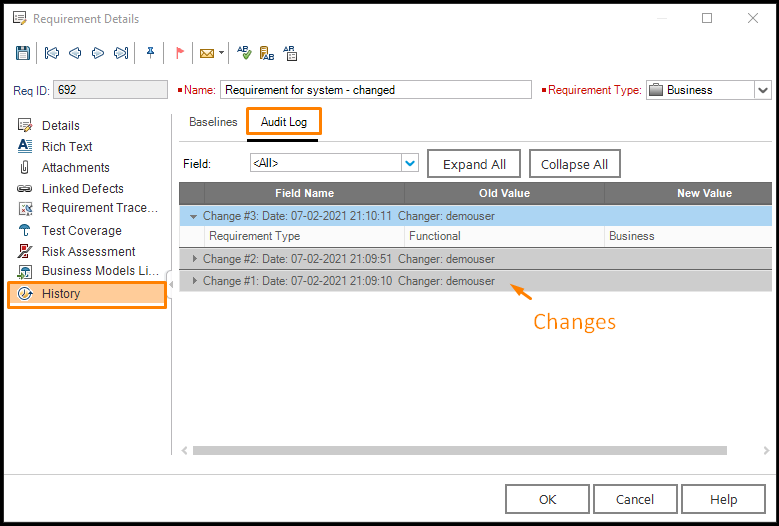
### Enable history of fields to be mapped
* It is recommended to enable history at least on those fields that are going to be mapped in the integration for space.vars.SITENAME and on **Modified** field to ascertain whether any modifications are made on a particular field. Click [Enable history of fields to be mapped](#How-to-enable-history-of-fields-to-be-mapped) to learn the steps.
* If Micro Focus ALM/QC is the target system, then integration recovery will not work if the history has not been enabled. The integration recovery can, in fact, create duplicate entities in Micro Focus ALM/QC. Integration will throw error before performing create/update if history has not been enabled on any mapped field.
* If Micro Focus ALM/QC is the source system and history has not been enabled, then integration needs to be configured in **Current State Sync** mode only. You can learn about **Current State Sync** mode from [here](https://docs.opshub.com/v7.215/integrate/configure-integrations/integration-configuration#sync-only-current-state).
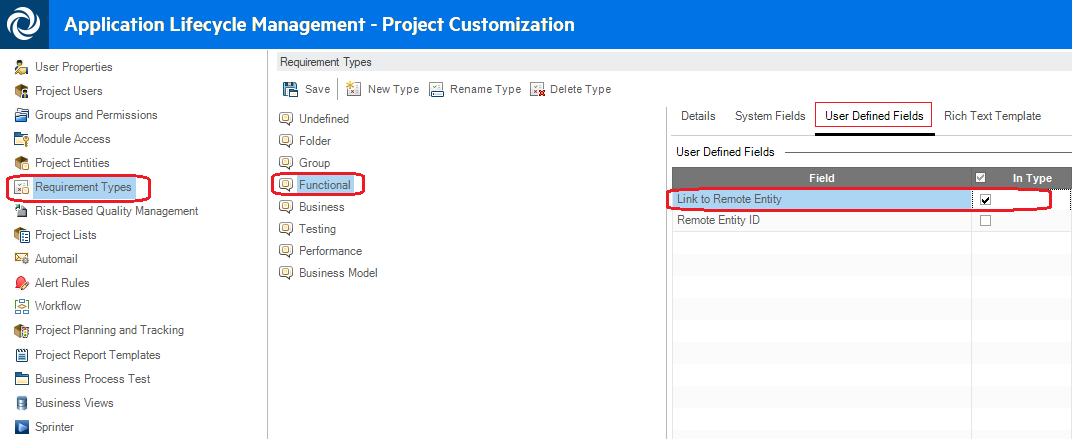
### Associate a custom field with the Requirement
* For the **Requirement** entity, if user wants to use a custom field in mapping, then the custom field must be associated with all the Requirement Types that will be used in the mapping.
* Click [How to associate a custom field with Requirement](#How-to-associate-a-custom-field-with-Requirement) to know the steps.
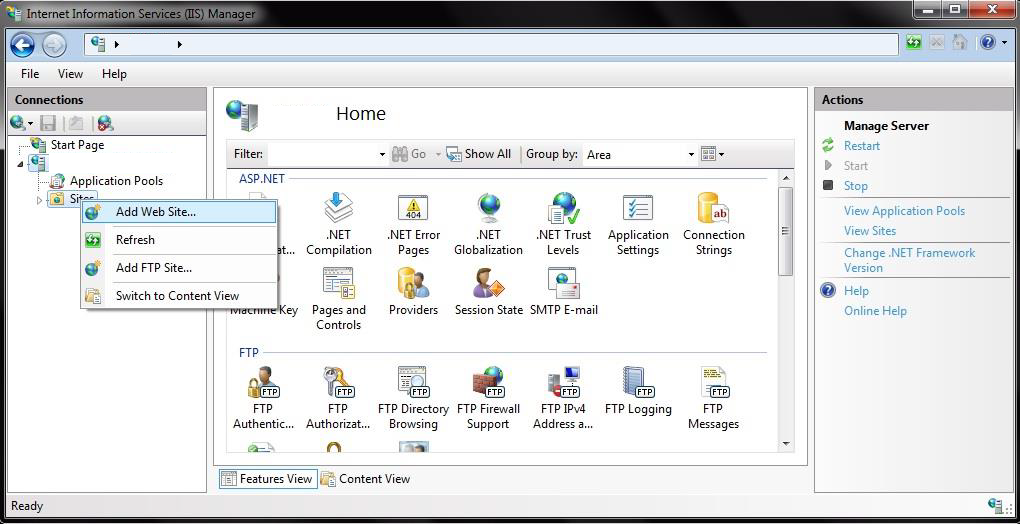
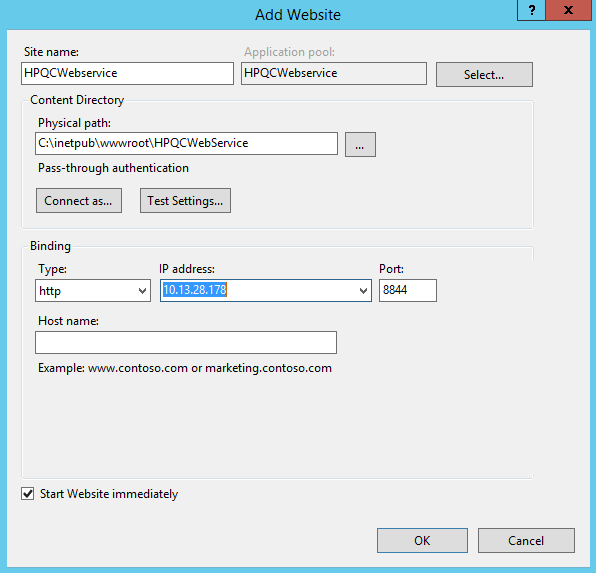
## System Configuration
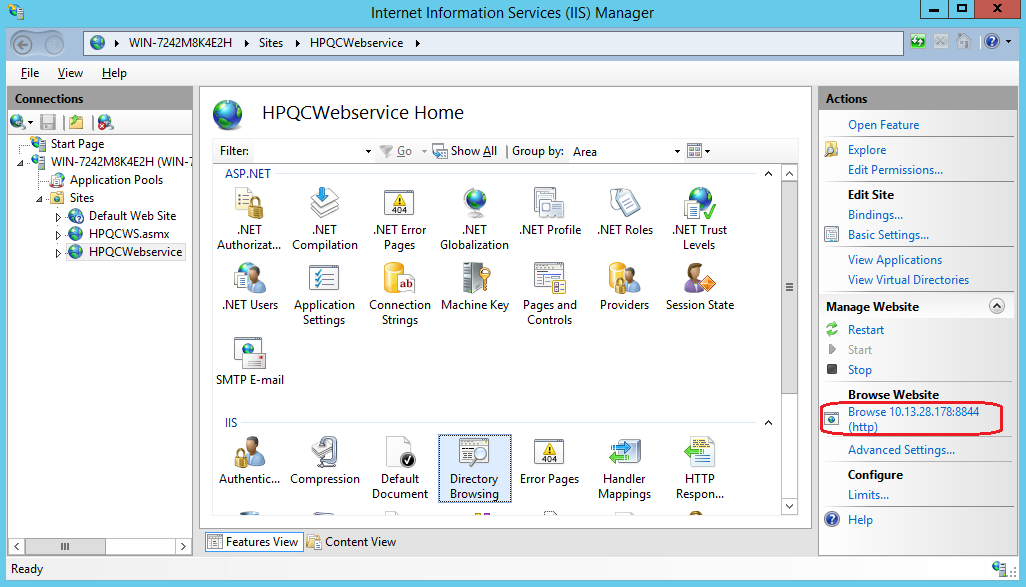
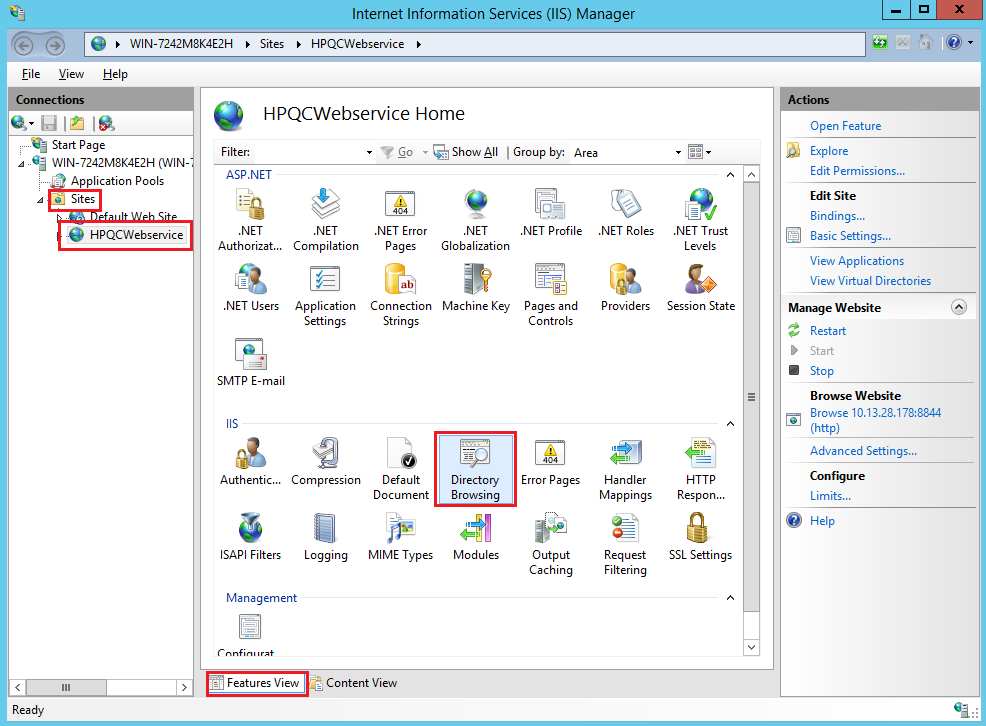
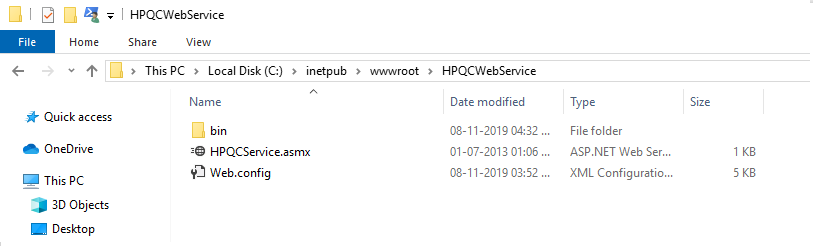
Before you continue to the integration, you must first configure Micro Focus ALM/QC.\
Click [System Configuration](https://docs.opshub.com/v7.215/integrate/configure-integrations/system-configuration) to learn the step-by-step process to configure a system.\
Refer the screenshot given below for reference.

space.vars.SITENAME supports above relationship synchronization using the following link type(s):
* `TEST_INSTANCE`
* Map this linkage to synchronize association between Test Set and Test entities.
* `TEST_INSTANCE(Configuration)`
* Map this linkage to synchronize association between Test Set and Test Configurations entities.
* To synchronize the Responsible Tester field of the above Test Instance linkage(s), advanced XSLT needs to be written in the relationship mapping of space.vars.SITENAME.
* In the advanced mapping, the Responsible Tester field will be referred to as `owner`.
> **Note**: The advanced mapping can be customized as per the target system.
#### Default mapping of link relationship:
```xml
```
The above mapping can be changed to the below mentioned advanced mapping to synchronize the Responsible Tester.
```xml
```
## Integration Configuration
Set a time to synchronize data between Micro Focus ALM/QC and the other system to be integrated. Also, define parameters and conditions, if any, for integration.
Click [Integration Configuration](https://docs.opshub.com/v7.215/integrate/configure-integrations/integration-configuration) to learn the step-by-step process to configure integration between two systems.
### Criteria Configuration
If you want to specify conditions for synchronizing an entity between Micro Focus ALM/QC and the other system to be integrated, you can use the Criteria Configuration feature.
Go to the **Criteria Configuration** section on the [Integration Configuration](https://docs.opshub.com/v7.215/integrate/configure-integrations/integration-configuration) page to learn in detail about Criteria Configuration.
**Configure**\
To configure criteria in Micro Focus ALM/QC, integration needs to be created with Micro Focus ALM/QC as the source system.
**Query**\
Query in Micro Focus ALM/QC is the valid SQL (version 10.0) / REST (version 11.x, 12.x) query that can contain any column property name (internal name of fields) available in Micro Focus ALM/QC.
#### Sample Queries
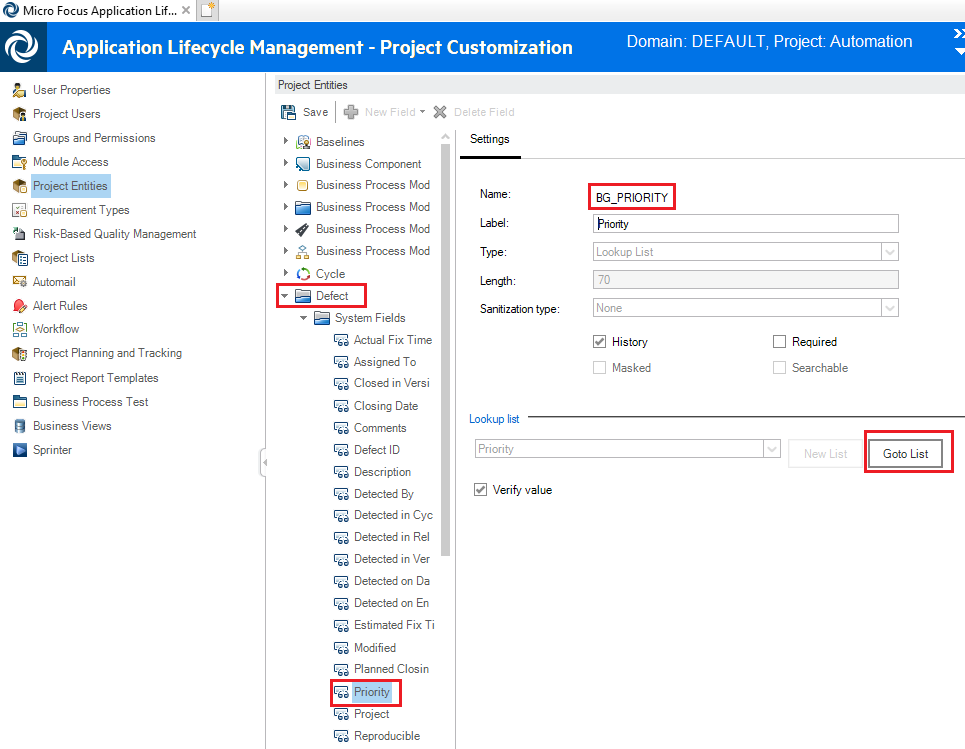
* **Micro Focus ALM/QC 10:**\
`BG_PRIORITY='1-Low'` (Steps given above are applicable for version 10.0 only)
* **Micro Focus ALM/QC 11.x / 12.x:**
* `priority[1-Low];status[Open]` (REST-based queries do not allow `or` condition)
* `creation-time[>2017-11-02]`
* Search for custom field `User_02` with value `80`. The front-end name of `User_02` is `Remote Id`:\
`user-02[=80]`
Criteria with value containing `"` is not supported in Integration Configuration.
Learn [How to find out internal name/key in versions](#how-to-find-out-internal-namekey-in-version).
### Supported Target Lookup Queries
* Search for custom field `User_02`. The front-end name of `User_02` is **Remote Id**.
* Query format is:\
`user-02[=@RemoteID@]`\
where **RemoteID** is a field of the source.
* For query format based on different Micro Focus ALM/QC versions, please refer [Criteria Configuration](#criteria-configuration) on this page.
## known Behaviour
* Micro Focus ALM/QC 11 allows creating entities even when mandatory fields are not specified.
* Micro Focus ALM/QC 10 truncates data of custom fields if the data size is greater than field length.
* The usage of Micro Focus ALM/QC comments is based on certain assumptions. Click [Micro Focus ALM/QC Comments](#micro-focus-alm-qc-comments) to learn more.
* In Micro Focus ALM/QC, the details of the user who has updated the entity is known through history. Hence, the **OH\_UpdatedBy** field information can be synchronized only if the information related to history is present at the time of synchronization for a given entity.
* For checking if the history is present or not for an entity, refer to [Check if entity has history](#check-if-entity-has-history).
* **OH\_UpdatedBy**: This is a field provided by space.vars.SITENAME for synchronization of the user details who updated the given entity.
* **User field synchronization**: For Micro Focus ALM/QC version ≥ 15.0, the user email address detail can be accessed only by site administrator users. Therefore, to synchronize the User field, one of the following must be done:
* The sync user must be a site administrator for user field sync to work on email (with default mapping).
* If sync user can't be given site administrator rights, then user field sync will work if the **Usernames are the same** in both the end systems with default mapping. If the Usernames are not the same, the user can do advanced mapping to achieve one-to-one mapping on username.
* For cycle entity, attachments will be synchronized only when there will be an update on any other history-enabled field.
* A **Root** folder is available for every project by default in Micro Focus ALM for Test Set Folder entity. Hence, when Micro Focus ALM is the target system and synchronizes the Test Set Folder entity, the test set folders will be created inside the **Root** folder.
* If you want to create the Test Set Folder under any other Test Set Folder, you can achieve that using the parent/child [Relationship Configuration](https://docs.opshub.com/v7.215/integrate/configure-integrations/mapping-configuration#relationships).
* When Micro Focus ALM is the target system (Test Set Folder entity), if the Test Set Folder being synchronized has the same name as an already present Test Set Folder (at the same level), then you will receive a processing failure message, [OH-Micro\_Focus\_ALM/QC-012656](https://docs.opshub.com/v7.215/help-center-index/troubleshooting-index/errors-index/microfocus-error-solutions/oh-microfocus-012656).
* **Reason:** Micro Focus ALM doesn't allow a Test Set Folder with the same name under a parent.
* While getting baseline name for an entity, if space.vars.SITENAME encounters an error like `Item does not exist`, the synchronization of the Baseline field will be skipped for that entity. However, this information will be added to the logs.
* The Test Set Folder and Test Plan Folder entities do not have history. Hence, they can be synchronized in **current state only**.
* **Design steps and Parameters sync:**
* For versioned projects, Design steps and Parameters will be synced along with the history.
* For non-versioned projects, they will sync with the current state only.
* In the below-mentioned scenarios, discrepancies may be observed in the sync of Design steps and Parameter values:
* If a versioned project is changed to a non-versioned project in Micro Focus ALM, discrepancies may be observed in the Design Steps and Parameters sync.
* For versioned projects, when a Test entity with unchecked design steps is executed: In that case, the Test Run entity will be generated with incorrect test version and unchecked design steps.
* When a parameter of a Design Step with uppercase letters is created directly by placing it in between `<<<` and `>>>`, then a parameter gets generated with lowercase by Micro Focus ALM itself. It can result in discrepancies while syncing the parameters to the end systems having a parameter-name with case sensitivity.
* However, the above case sensitivity issue can be handled with the following snippet:
**Snippet to handle case sensitivity issue:**
```xml
```
* **Release Folder:**
* In bidirectional integration, to sync the root folder, the user needs to configure the target lookup between the source's root entity and the target's root entity to avoid a hierarchy mismatch.
* In case there is no need to sync the root folder, the user can configure criteria to avoid the sync. For example, if the root folder id of HPQC Release folder is `1`, the sample query would be: `id[<>1]`
### Known Limitations
* For Cycle entities, the link to the Release cannot be modified after creation.
## Appendix
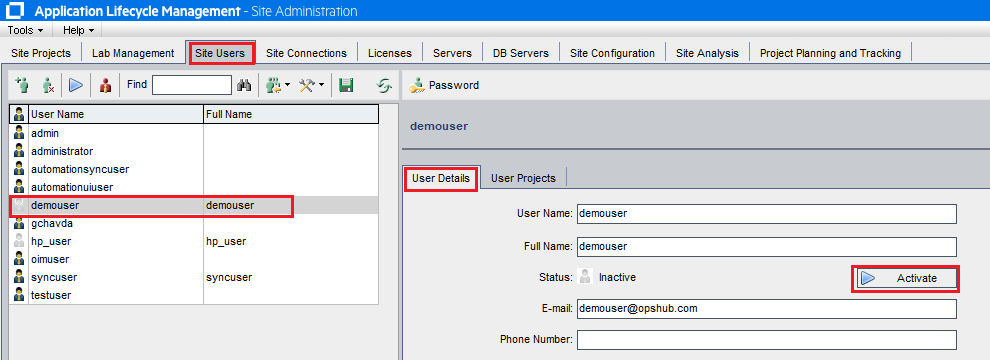
### Activate the User as a Site User
* Log in to Micro Focus ALM/QC Site Administration.
* Click **Site Users**.
* Expand the domain and click the User to whom you want to make an **Active Site User**.
* Click **User Details**.
* Click **Activate**.
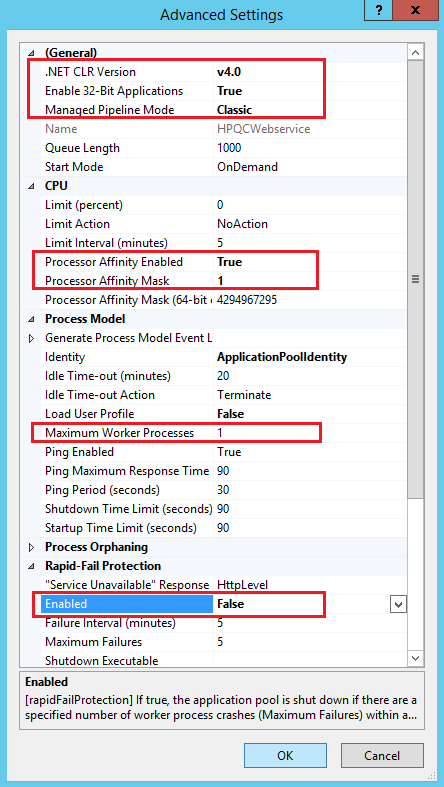
.NET CLR Version: v4.0
Enable 32-Bit Applications: True
Managed Pipeline Mode: Classic
|
| **CPU** | Processor Affinity Enabled: True
Processor Affinity Mask: 1
|
| **Process Model** | Maximum Worker Processes: 1 |
| **Rapid-Fail Protection** | Enabled: False |
> **Note**: Enable 32-Bit Applications is required only when the Proxy Host machine is 64-Bit.
* For the reference, please refer below screenshot of Advanced Settings.