\* Double click the executable .exe file given in the application folder (It is advisable to run .exe file by right-clicking Run as administrator where \* is replaced with the application version).
If one instance of this release is already installed, then the user will be notified.
\* Click yes to continue with the installation. It will then display the uninstallation key for the current installation.
Before Installation
\* Extract the zip file. Make sure user who will run installer owns the files and has full access to extracted files.
\* Create empty directory with full access(it should not be inside installation directory) and export it's path to OPSHUB\_TEMP\_DATA variable as shown in below example:
export OPSHUB\_TEMP\_DATA=/home/setup/temp
\* If you are doing a silent installation, make sure you have provided the same path for OPSHUB\_TEMP\_DATA as provided during Silent Registration for Linux.
\* If Linux has NFS (Network File System) based file system, please add the following line in OIM user's '.bashrc' file:
In /home/{OIM user}/.bashrc file, add the following line at the end:export JAVA\_OPTS="$JAVA\_OPTS -XX:+StartAttachListener"
Without the Java option, the server start up will fail. The error details are available here.
\* See minimal access required to install OpsHub Integration Manager here, when you do not have root access.
To Run sh file
\* Open terminal window and go to the folder containing the install.sh file.
\* Execute the following command: sudo -E sh install.sh.
\* To run the sh File, you need to have access to Linux UI. This is because the installation process requires user inputs through UI. Installation won't get completed through remote terminal connection (i.e. Putty).
To Run sh File from External File (Silent Installation)
To install OpsHub Integration Manager through terminal connection (i.e. Putty), follow the steps given below:
\* Complete user registration as described here.
\* Download and modify OpsHubAutoInstall.xml file as per your requirement by click here.
\* Make sure, you will transfer the modified file on the instance where you want to install OpsHub Integration Manager.
\* Set an environment variable OPSHUB\_AUTO\_INSTALL on the installation instance, the value of variable is the path to the OpsHubAutoInstall.xml file. File name can be different.
For example, export OPSHUB\_AUTO\_INSTALL=/home/Downloads/OpsHubAutoInstall.xml.
\* After setting environment variable, run the installer with command sudo -E sh install.sh.
\* Please refer Possible Error section for trouble shooting error(s) occurred during Installation.
space.vars.SITENAME Installer for Linux
* It is recommended to install or perform migration of the space.vars.SITENAME in the /opt folder or /user/local folder.
* For space.vars.SITENAME migration, if the space.vars.SITENAME is not installed at the above places, then follow the steps mentioned here.
* Reason: SELinux prevents Linux users from running a space.vars.SITENAME service in the user's home directory. Hence, the user needs to avoid installing space.vars.SITENAME in the home directory.
#### Minimal access required to run linux installer using external file
* space.vars.SITENAME Installation Directory should be owned by user who run installer/migrator and has following permissions.
Here are the required permissions:
| **Permission** | **Directory** |
| -------------- | --------------------------------------------------------------------------------------------------------------- |
| --x | /usr |
| --x | /proc |
| r-x | /usr/bin |
| r-x | /usr/bin/\* |
| --x | /usr/lib64 |
| r-x | /usr/lib64/\* |
| --x | /usr/share (if user edits file using nano) |
| r-x | /usr/share/\* |
| rw- | /etc/systemd/system (if user needs space.vars.SITENAME as a service for Ubuntu) |
* Note: For HSQLDB, root access is required when user needs to install/migrate space.vars.SITENAME.
#### Possible error during Silent Installation/Upgradation
\[ Starting automated installation ]
\[Timestamp] java.util.prefs.FileSystemPreferences$2 run
INFO: Created system preferences directory in java.home.
com.izforge.izpack.installer.InstallerException: Validating data for panel UserInputPanel.EmailIdVerificationForExistingCode was not successfull
com.izforge.izpack.installer.InstallerException: Validating data for panel UserInputPanel.EmailIdVerificationForExistingCode was not successfull
at com.izforge.izpack.installer.AutomatedInstaller.validatePanel(Unknown Source)
at com.izforge.izpack.installer.AutomatedInstaller.installPanel(Unknown Source)
at com.izforge.izpack.installer.AutomatedInstaller.doInstall(Unknown Source)
at com.izforge.izpack.installer.Installer.main(Unknown Source)
\[ Automated installation FAILED! ]
**Solution**
Make sure you have performed the following steps correctly:
* You have registered as described [Registration - Silent Registration for Linux](https://docs.opshub.com/v7.215/getting-started/registration#silent-registration-for-linux) before Installation/Upgradation.
* You have registered using the same path for which you install/upgrade space.vars.SITENAME.
* You have used the correct verification code.
* Verification Code is unique for each machine and installation path. The code generated on a different machine and for different path won't work.
* You have export same value for OPSHUB\_TEMP\_DATA during Registration and Installation/Upgradation.
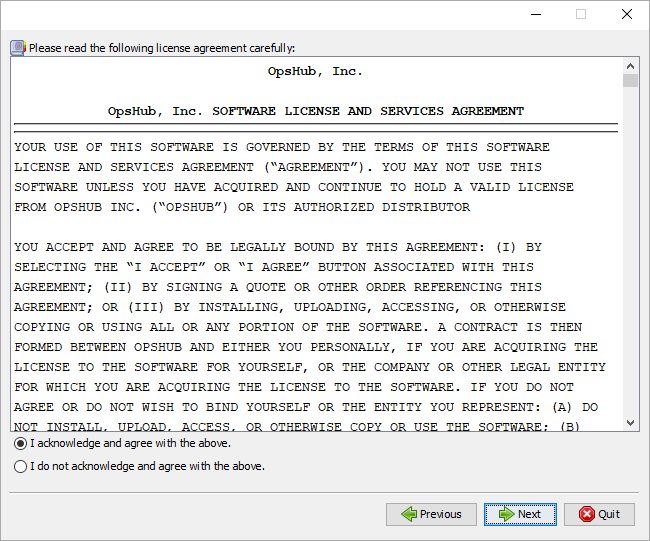
### License Information
On launching the installer, you will see the license agreement window that contains all license-related terms and conditions.
If you agree with the license details, then only you can move to the next step i.e. Installation.
space.vars.SITENAME throws exceptions as below:
* **Unable to install license** `com.opshub.license.exception.LicenseException`: Failed to get license content because of If you are accessing OpsHub from different machine then change localhost to ip address of the machine where OpsHub installed.
* **The filename, directory name, or volume label syntax is incorrect**
com.opshub.license.install.OpsHubLicenseManager.getLicenseContent(OpsHubLicenseManager.java:60) at com.opshub.license.install.OpsHubLicenseOperationManager.getLicenseContent(OpsHubLicenseOperationManager.java:34) at com.opshub.license.install.LicenseInstaller.getOHLicenseContent(LicenseInstaller.java:128) at com.opshub.license.install.LicenseInstaller.installLicense(LicenseInstaller.java:57) at com.opshub.license.install.LicenseInstaller.installLicense(LicenseInstaller.java:51) at com.opshub.license.server.LicenseBO.validateAndInstallLicense(LicenseBO.java:329) at com.opshub.license.server.LicenseServer.validateAndInstallLicense(LicenseServer.java:96) at sun.reflect.NativeMethodAccessorImpl.invoke0(Native Method) at sun.reflect.NativeMethodAccessorImpl.invoke(NativeMethodAccessorImpl.java:62) at sun.reflect.DelegatingMethodAccessorImpl.invoke(DelegatingMethodAccessorImpl.java:43) at java.lang.reflect.Method.invoke(Method.java:483) at com.metaparadigm.jsonrpc.JSONRPCBridge.call(JSONRPCBridge.java:1122) at com.opshub.JSON.JSONRPCServlet.service(JSONRPCServlet.java:349) at javax.servlet.http.HttpServlet.service(HttpServlet.java:729) at org.apache.catalina.core.ApplicationFilterChain.internalDoFilter(ApplicationFilterChain.java:230) at org.apache.catalina.core.ApplicationFilterChain.doFilter(ApplicationFilterChain.java:165) at org.apache.tomcat.websocket.server.WsFilter.doFilter(WsFilter.java:53) at org.apache.catalina.core.ApplicationFilterChain.internalDoFilter(ApplicationFilterChain.java:192) at org.apache.catalina.core.ApplicationFilterChain.doFilter(ApplicationFilterChain.java:165) at org.apache.catalina.filters.HttpHeaderSecurityFilter.doFilter(HttpHeaderSecurityFilter.java:120) at org.apache.catalina.core.ApplicationFilterChain.internalDoFilter(ApplicationFilterChain.java:192) at org.apache.catalina.core.ApplicationFilterChain.doFilter(ApplicationFilterChain.java:165) at com.opshub.JSON.CacheControlFilter.doFilter(CacheControlFilter.java:27) at org.apache.catalina.core.ApplicationFilterChain.internalDoFilter(ApplicationFilterChain.java:192) at org.apache.catalina.core.ApplicationFilterChain.doFilter(ApplicationFilterChain.java:165) at org.apache.catalina.core.StandardWrapperValve.invoke(StandardWrapperValve.java:199) at org.apache.catalina.core.StandardContextValve.invoke(StandardContextValve.java:96) at org.apache.catalina.authenticator.AuthenticatorBase.invoke(AuthenticatorBase.java:474) at org.apache.catalina.core.StandardHostValve.invoke(StandardHostValve.java:140) at org.apache.catalina.valves.ErrorReportValve.invoke(ErrorReportValve.java:79) at org.apache.catalina.valves.AbstractAccessLogValve.invoke(AbstractAccessLogValve.java:624) at org.apache.catalina.core.StandardEngineValve.invoke(StandardEngineValve.java:87) at org.apache.catalina.connector.CoyoteAdapter.service(CoyoteAdapter.java:349) at org.apache.coyote.http11.Http11Processor.service(Http11Processor.java:495) at org.apache.coyote.AbstractProcessorLight.process(AbstractProcessorLight.java:66) at org.apache.coyote.AbstractProtocol$ConnectionHandler.process(AbstractProtocol.java:767) at org.apache.tomcat.util.net.NioEndpoint$SocketProcessor.doRun(NioEndpoint.java:1347) at org.apache.tomcat.util.net.SocketProcessorBase.run(SocketProcessorBase.java:49) at java.util.concurrent.ThreadPoolExecutor.runWorker(ThreadPoolExecutor.java:1142) at java.util.concurrent.ThreadPoolExecutor$Worker.run(ThreadPoolExecutor.java:617) at org.apache.tomcat.util.threads.TaskThread$WrappingRunnable.run(TaskThread.java:61) at java.lang.Thread.run(Thread.java:745) Caused by: java.io.FileNotFoundException: If you are accessing OpsHub from different machine then change localhost to ip address of the machine where OpsHub installed.
* **The filename, directory name, or volume label syntax is incorrect**
at java.io.FileInputStream.open(Native Method) at java.io.FileInputStream.(FileInputStream.java:138) at de.schlichtherle.license.LicenseManager.loadLicenseKey(LicenseManager.java:741) at com.opshub.license.install.OpsHubLicenseManager.getLicenseContent(OpsHubLicenseManager.java:55)
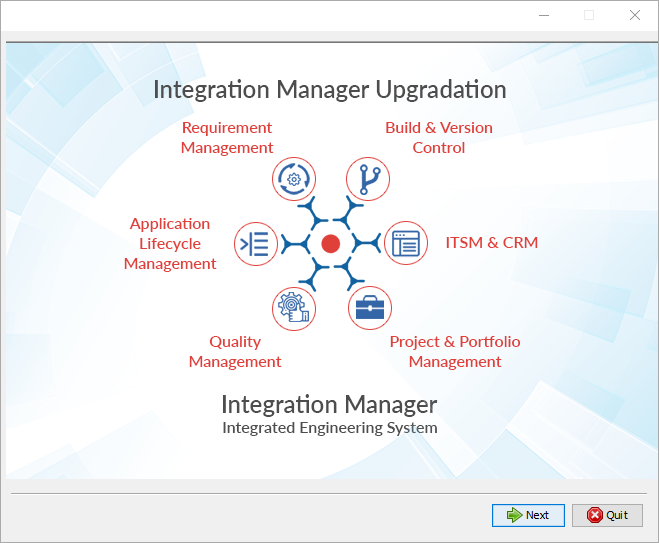
## Installation
Here is a video on how to install space.vars.SITENAME on the Windows machine:
{% embed url="

space.vars.SITENAME launcher.
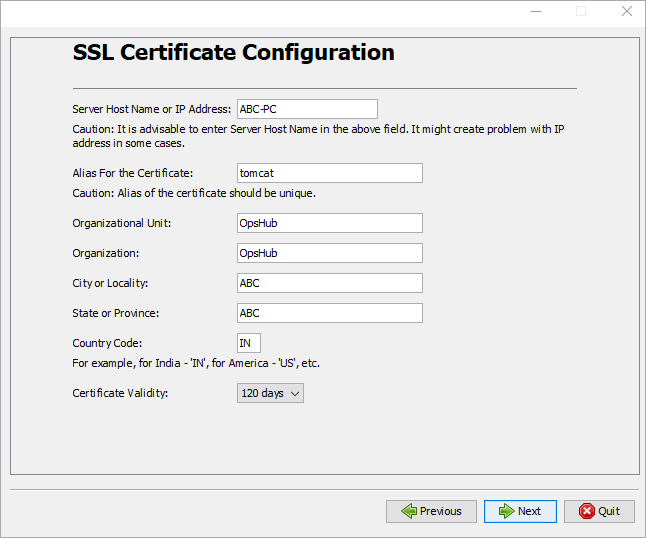
space.vars.SITENAME will be installed with SSL configuration. But the corresponding SSL certificate imported will be self-signed. In case you want to install certificate signed by your CA authority then follow the steps given in this section [How To Import a Certificate](https://docs.opshub.com/v7.215/getting-started/installation/how-to-import-a-certificate) in appendix.
## Manual creation of databases
For manual creation of databases, you can use the following queries:
### Queries for MySQL database
Let's name the database as `db1`:
```sql
DROP DATABASE IF EXISTS db1;
CREATE DATABASE db1 CHARACTER SET utf8mb4 COLLATE utf8mb4_bin;
```
Let's name the reports database as reportsdb:
```sql
DROP DATABASE IF EXISTS reportsdb;
CREATE DATABASE reportsdb CHARACTER SET latin1 COLLATE latin1_general_cs;
```
### Queries for MS SQL/Azure SQL Database
**Collation Considerations**
* For Multiple Language Systems:
* If your end systems support multiple language characters, it's essential to choose a collation that supports **UTF** characters.
* To enable UTF character support in space.vars.SITENAME, install it on **Microsoft SQL Server 2019 or above**.
* Select a collation with a `UTF` postfix, for example: `Latin1_General_100_CS_AS_SC_UTF8`
* For Single Language Systems:
* If your end systems utilize a single language and your selected collation includes all the necessary characters and is supported in SQL Server versions below 2019, you can proceed with the installation on SQL Server version below 2019. Select an appropriate collation that suits your end systems \[which are going to be configured in space.vars.SITENAME].
* Select an appropriate collation that suits your end systems (which will be configured in space.vars.SITENAME).
* Here is [guide](https://learn.microsoft.com/en-us/sql/relational-databases/collations/collation-and-unicode-support?view=sql-server-ver16) that may help you decide the right collation for your database.
> **Note:**\
> We need **1 database** and **2 schemas** to be created manually, out of which The **database and schema name must be the same** for the OpsHub database, and another schema should be created for **reportsdb**.
```sql
drop database IF EXISTS db1
db1 database: create database db1 COLLATE Latin1_General_CS_AS;
db1 schema: create schema db1;
Reports schema: create schema reportsdb;
```
### Queries for Oracle Database
> **Note:** Replace `<space.vars.SITENAME's database, follow the below-mentioned steps:
**Important Note**
* When changing the collation, compare the code pages of the old and new collations to ensure that character representations are consistent and prevent data conversion issues. For example, changing Turkish\_CS\_AS collation to Latin1\_General\_CS\_AS will convert "ı"(dott-less i) to "i".
* When considering a collation change, it's important to be aware about variations in character encoding and sorting rules between the old and new collation settings. Character conversion will occur during the process of collation change as mentioned in the above example. This conversion can lead to the irreversible loss of the original data.
**Procedure:**
1. **Stop the** space.vars.SITENAME **Server**: Ensure the space.vars.SITENAME server is not running.
2. **Database Backup**: Take a backup of the database.
3. **Download Scripts**: Download the provided script by clicking [here](https://opshubtrial-my.sharepoint.com/:u:/g/personal/support_opshub_com/EeqVoEYk3gVHsQT8Y4_CrRsB_SkllsEiDWv1YrEbLEfbDw?e=VLcoFu).
4. **SQL Editor**: Open the SQL editor.
5. **Changing the columns collation**: Open the **Migration Script** file and replace `YOUR_COLLATION_NAME` with the collation name you would like to migrate to as the new collation. Execute the **Migration Script** and copy the generated SQL statements. Open a new window in SQL editor, paste those statements and execute them.
6. **Database collation change**: Open the **Database Collation Change Script** file and replace `YOUR_COLLATION_NAME` with the collation name you would like to migrate to as the new collation. Also, replace `YOUR_DATABASE_NAME` with the name of the database on which space.vars.SITENAME is installed. Execute the script file.
7. **Start** space.vars.SITENAME **Server**: Restart the space.vars.SITENAME server.