space.vars.SITENAME. User should not be used to do any operations from system's user interface.
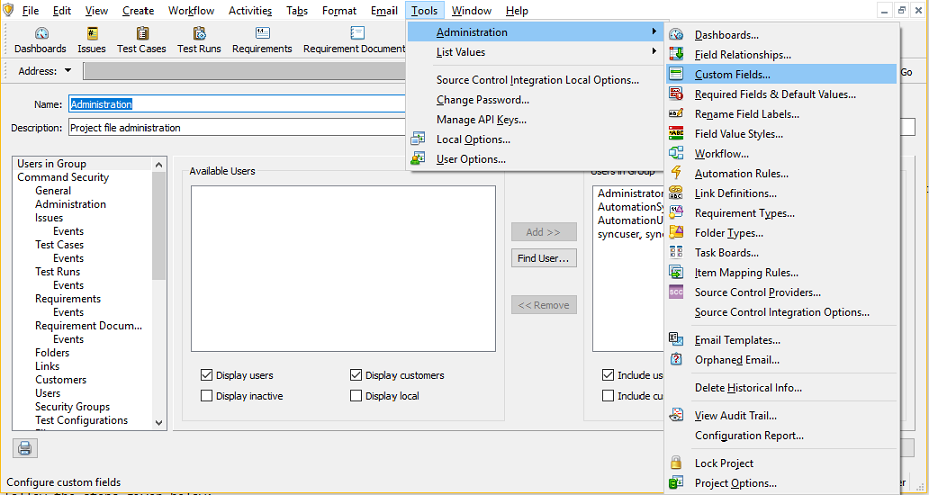
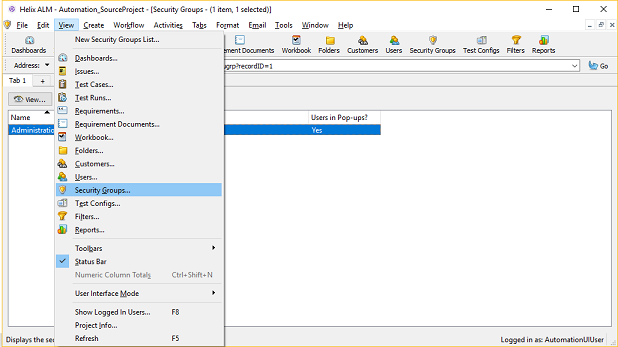
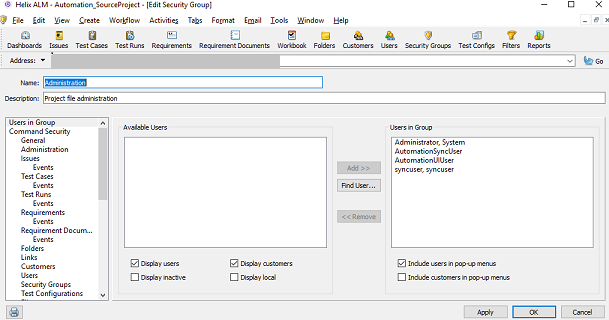
* User should not be used to create or update any entities from Helix ALM user interface. For help on how to add user, please refer [Add User](#add-user) in appendix. For help on how to assign user to groups, please refer [Assign User Privileges](#giving-user-privileges) in the appendix.
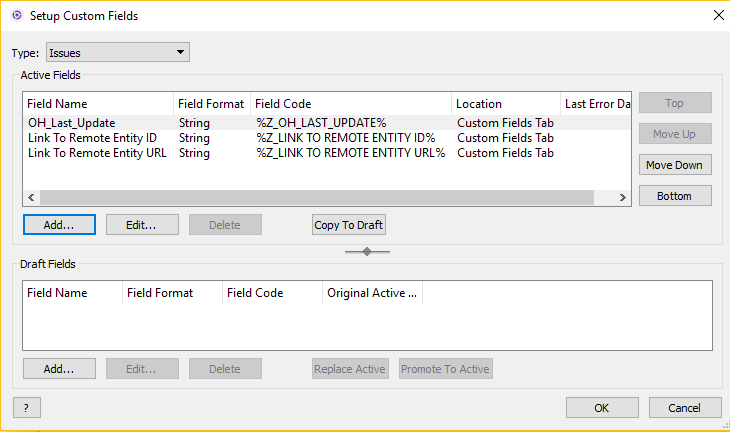
### Custom field
One special field is required on the entity that is being synchronized to Helix ALM. This must be set up so that the integration status of each item can be tracked:
| **Property Name** | **Type** | **Size** |
| :---------------: | :------: | :------: |
| OH\_Last\_Update | String | 255 |
For more details on adding custom fields, refer [Custom fields](#custom-fields) in appendix section.
### Other prerequisites
* Helix ALM SOAP CGI and Helix ALM REST API Server must be installed to communicate with Helix ALM Server. Refer to [Installing Helix ALM SOAP CGI](https://help.perforce.com/helix-alm/helixalm/current/sdk/Content/SDK/GettingStarted.htm) and [Installing Helix ALM Rest API Server](https://help.perforce.com/helix-alm/helixalm/current/restapi/Content/RESTAPI/InstallingAPI.htm) for more details.
## System Configuration
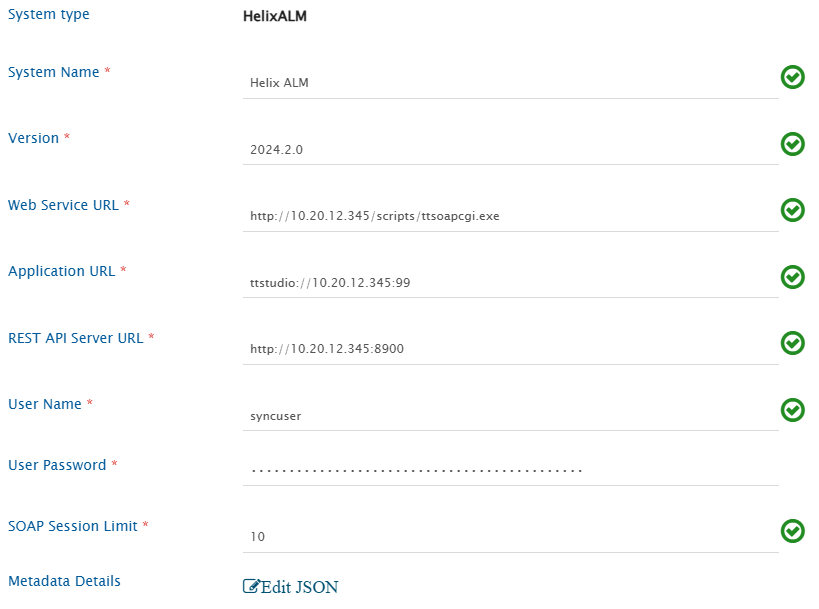
Before you continue to the integration, you must first configure Helix ALM. Click [System Configuration](https://docs.opshub.com/v7.216/integrate/configure-integrations/system-configuration) to learn the step-by-step process to configure a system.\
Refer the screenshot given below for reference.
Set System Name to Helix ALM or any other name you want. This name will appear throughout the application
Note: System Name should be unique
space.vars.SITENAME. Click [Import SSL Certificate](https://docs.opshub.com/v7.216/getting-started/installation/ssl-certificate-configuration) to learn how to import SSL certificate.\
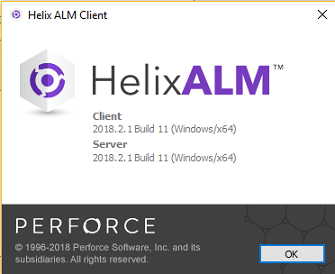
For checking the version of your Helix ALM instance, refer [Find Version](#find-version) in appendix.
### Understanding JSON Input
* If the user wants to read some fields that are not available by default, then the user can provide those fields information in the form of JSON.
* Refer the following example:
```json
{
"entities": [
{
"displayName": "Issue",
"internalName": "Issue",
"fields": {
"custom": [],
"system": [
{
"displayName": "Is Marked As Suspect",
"internalName": "Is Marked As Suspect",
"dataType": "boolean",
"readOnly": true,
"historyEnabled": false
}
]
}
}
],
"projects": []
}
```
* Refer to [Understanding Json Metadata Input](https://docs.opshub.com/v7.216/integrate/configure-integrations/system-configuration#understanding-json-metadata-input) section for more details on the JSON input.
* When Helix ALM is the target system and **Resulting State** field needs to be synchronized, JSON input must be provided.
* For each entity, the system/custom fields information of Workflow events must be provided in the JSON input.
* For each field (except OH\_State\_Event), the **outputType** of the field must be provided in the **systemSpecific** input.
* Refer the following table for the **outputType** of different field types.
| **Field Type** | **Output Type** |
| -------------------------------- | --------------- |
| Check Box | boolean |
| Date | date |
| Date (Including time) | dateTime |
| Decimal | decimal |
| Dropdown | menuItem |
| Dropdown (Multiple values) | menuItemArray |
| Hyperlink | string |
| Integer | integer |
| Multi-line text | formattedString |
| String | string |
| Users Dropdown | user |
| Users Dropdown (Multiple values) | userArray |
* Following fields are mandatory in the JSON input for **Resulting State** field synchronization:
1. **Resulting State**
* It should be a lookup type of system field.
* The **lookupValues** should be such that both the key and value are the name of the resulting states.
2. **OH\_State\_Event**
* It should be a lookup type of custom field.
* It should be a read-only field.
* The **lookupValues** should be such that the key is the name of the state and value is the name of the event.
* Refer the following example of JSON input for the **Issue** entity:
```json
{
"entities": [
{
"displayName": "Issue",
"internalName": "Issue",
"fields": {
"custom": [
{
"displayName": "Resolution",
"internalName": "Resolution",
"dataType": "lookup",
"mandatory": false,
"historyEnabled": false,
"lookUpValues": {
"Clarification": "Clarification",
"Code Change": "Code Change",
"Documentation Change": "Documentation Change",
"Not a Bug": "Not a Bug",
"Not Our Bug": "Not Our Bug"
},
"systemSpecific": {
"outputType": "menuItem"
}
},
{
"displayName": "OH_State_Event",
"internalName": "OH_State_Event",
"dataType": "lookup",
"readOnly": true,
"mandatory": false,
"historyEnabled": false,
"lookUpValues": {
"Closed": "Force Close",
"Closed (Fixed)": "Fix",
"Closed (Verified)": "Verify",
"Fixed": "Fix",
"Open (Re-Opened)": "Re-Open",
"Open (Verify Failed)": "Verify"
}
}
],
"system": [
{
"displayName": "Resulting State",
"internalName": "Resulting State",
"dataType": "lookup",
"mandatory": false,
"historyEnabled": false,
"lookUpValues": {
"Closed": "Closed",
"Closed (Fixed)": "Closed (Fixed)",
"Closed (Verified)": "Closed (Verified)",
"Fixed": "Fixed",
"Open": "Open",
"Open (Re-Opened)": "Open (Re-Opened)",
"Open (Verify Failed)": "Open (Verify Failed)"
},
"systemSpecific": {
"outputType": "menuItem"
}
},
{
"displayName": "Notes",
"internalName": "Notes",
"dataType": "text",
"mandatory": false,
"historyEnabled": false,
"systemSpecific": {
"outputType": "string"
}
}
]
}
}
],
"projects": []
}
```
* Refer to [Workflow Transition Configuration](#workflow-transition-configuration) section for details on configuring different transitions for the Resulting State field.
## Mapping Configuration
Map the fields between Helix ALM and the other system to be integrated to ensure that the data between both the systems synchronizes correctly. Click Mapping-configuration to learn the step-by-step process to configure mapping between the systems.
Click [Mapping Checkpoints](#mapping-checkpoints) to learn about mapping checkpoints for Helix ALM as a target system.
### Get Requirement Document Id's for Requirement
* In Helix ALM, a single Requirement can be added to multiple Requirement Documents.
* To fetch the record id's of all such Requirement Documents, the [Get field Value of Entity](https://docs.opshub.com/v7.216/integrate/configure-integrations/mapping-configuration/advance-mapping-utility#get-field-value-of-entity) utility can be used. In this utility method, the **Related Requirement Documents** will be used as field name.
* This utility will return all the Requirement Documents record id's separated by a comma.
* For example, if a Requirement is added to multiple Requirement Documents having record id's 1, 2, and 3, the utility will return "1,2,3".
* Given below is a sample advance XSL for getting the Requirement Documents record id's:
```xml
space.vars.SITENAME needs to first log into the project. Every login consumes a license. If more projects are configured, login and logout operations will be performed repeatedly, causing slowness in synchronization.
### Attachment Synchronization
For Helix ALM Issue entity, there can be multiple reports available \[under Detail tab] and each of this report can have multiple attachments.
* While synchronizing attachments from Helix ALM, all the attachments from all these reports will be synchronized to the target system.
* While synchronizing attachments to Helix ALM, all the attachments added in to other end system will be synchronized to the 1st report.
The examples given below will help you understand the attachment synchronization behavior with bidirectional synchronization.
Let's assume that we have a bidirectional integration configured between Helix ALM 'Issue' and VersionOne 'Defect' with attachment synchronization enabled in mapping configuration.
* If Issue 1 has 2 reports and each of them has 1 attachment \[let's assume : R1 is attachment for Report 1 and R2 is attachment for Report2], in VersionOne Defect, 2 attachments \[R1,R2] will be visible
* Now if we add 1 attachment \[V1] to VersionOne Defect, the attachment will be synchronized to the 1st Report (so Report 1 will have 2 attachments \[R1,V1] and Report 2 will have 1 attachment \[R2])\
Report 2 attachments will be untouched and won't be added back to Report 1.
* If we edit the attachment R1 in VersionOne Defect, the attachment will get deleted and, instead, add an attachment R1 on the 1st report.\
But if we edit the attachment R2 in VersionOne, it will be added to Report 1 and the attachment for Report 2 will be as it is (This is because of a known limitation)
### Relationship Synchronization
Given below are the expected behaviors while writing links to Helix ALM:
* Links created by space.vars.SITENAME will have only two entities participating in it. Suppose three issues "issue1", "issue2", and "issue3" are linked by "Related Items" in some source system. These links will be synced to Helix ALM as two different links for all of them. So, for the above case, it will be three different links "issue1" related to "issue2", "issue2" related to "issue3" and "issue3" related to "issue1".
* Link won't be added if link type "Require Comment" is enabled for link type.
Following are expected behaviors while reading links from Helix ALM:
* If there are two links having same parent and same set of children, space.vars.SITENAME will consider only one link.
* If there are more than 2 items participating in any link, it will be split in more than one link.
Suppose Requirement "req1" is related to 2 test cases "test1" and "test2" through "Requirement Tested By" type of link (it is one link with single parent and two children). In this case, two links will be synced by space.vars.SITENAME, one with each child "test1" and "test2".
### Workflow Transition Configuration
* When Helix ALM is the target system and user wants to synchronize **Resulting State** field, the Workflow Transition must be configured to transition from one state to another.
* In Helix ALM, each Workflow event can have multiple fields. Some can be mandatory also.
* To synchronize such fields, the user needs to provide them as dependent fields in the Workflow Transition XML.
* Refer to the following sample Workflow Transition XML for the **Resulting State** field:
```xml
space.vars.SITENAME does not support synchronization of **Test Config** field present under **Detail** tab in the **Issue** entity.
* Synchronization of only **Comment Workflow event** is supported.
* For Issue entity, the field label of all the Found By Records field should not be changed. It should be set to the default value.
* Found By Record fields supported by space.vars.SITENAME are Description, Steps to Reproduce, Other Hardware and Software, Version Found, Found By, Date Found, Reproduced.
* If the label of the field is changed in the end system, the mapping needs to be updated in the space.vars.SITENAME.
* If Requirement entity is configured for synchronization and Relationships synchronization is enabled:
* There should not be a custom link type in Helix ALM having same name as either "Requirement Relationships(Parent)" or "Requirement Relationships(Child)".
* If Helix ALM is the source system:
* For the Issue entity, there can be multiple reports available \[under the Detail tab], and each of these reports can have multiple fields with multiple inline images.
* All the fields of the first record only will be synchronized.
* The inline image synchronization for all the fields of the first report is only supported.
* If Helix ALM is the target system:
* Synchronization of "Requirement Relationships(Parent)" and "Requirement Relationships(Child)" links is not supported.
* Synchronization of different fields of the first Found By Record of Issue entity is supported.
## Appendix
### Add User
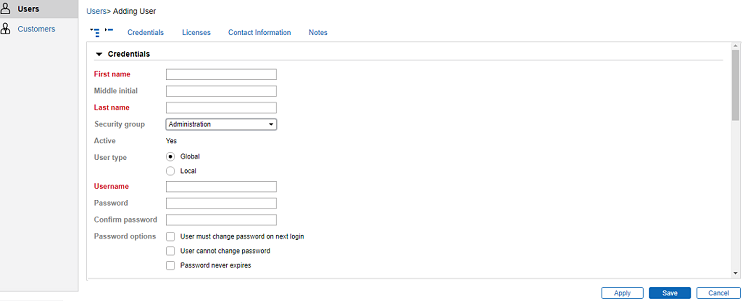
space.vars.SITENAME requires a few special fields to be defined on the entity that is being synchronized. These must be set up so that the integration status of each item can be tracked.