# Salesforce
### Prerequisites
### User privileges
* Create a dedicated space.vars.SITENAME user in Salesforce. This user shouldn't perform any other action from Salesforce's UI. For more details on creating a new user, refer to the [New User](#new-user) section.
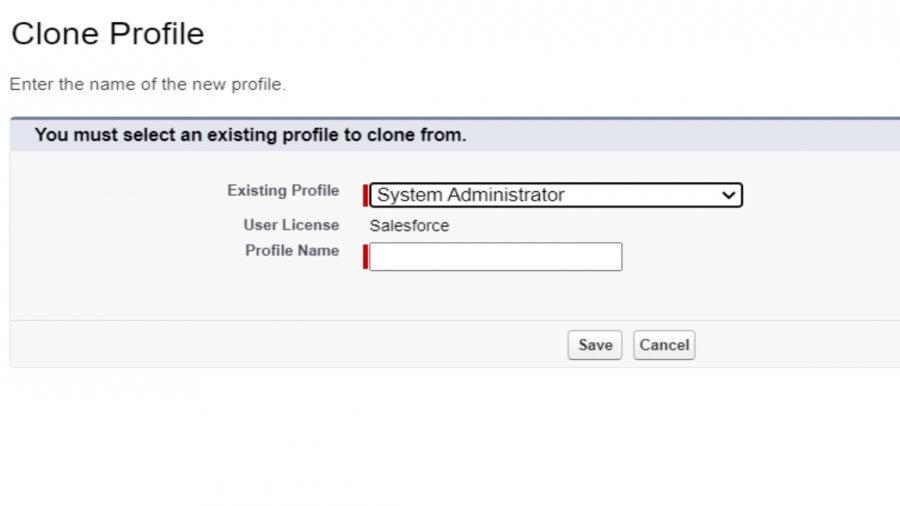
* The following permissions should be enabled in space.vars.SITENAME's dedicated user's profile (For details on creating a new profile, refer to the [New Profile](#new-profile) section) to synchronize object in space.vars.SITENAME:
| **Profile Section** | **Permission** | **Description** |
| ---------------------------------- | --------------- | ----------------------------------------------- |
| Administrative Permissions | API Enabled | To access Salesforce through their standard API |
| | View All Data | To read private notes |
| | Modify All Data | To edit private notes |
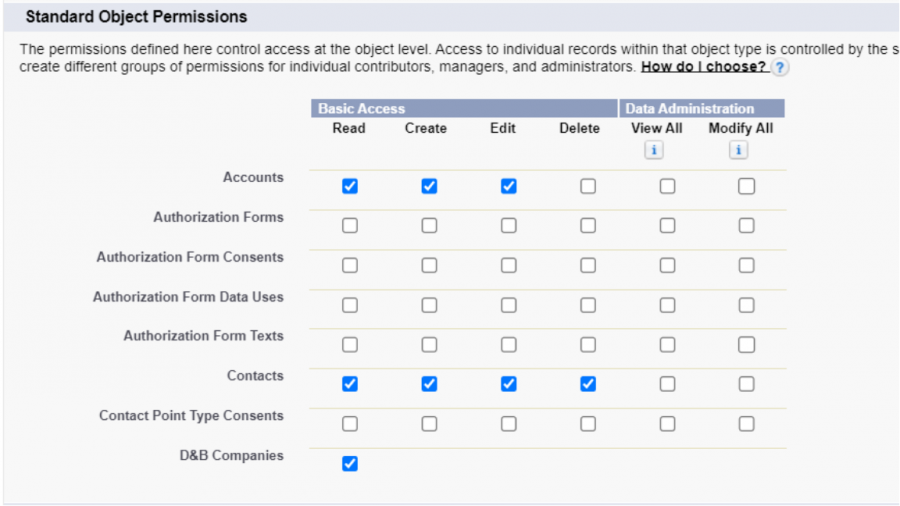
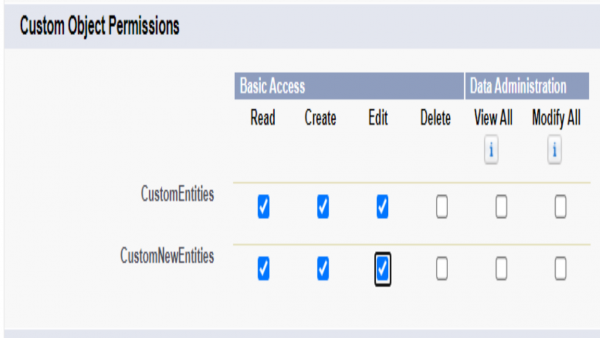
| Standard/Custom Object Permissions | Read | To view records |
| | Create | To read and create records |
| | Edit | To read and update records |
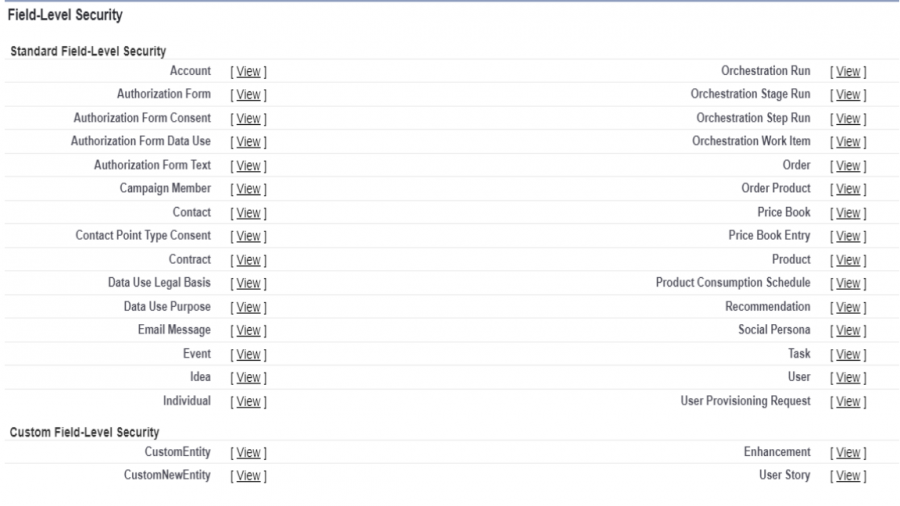
| Field-Level Security | Read Access | To read a field |
| | Edit Access | To read and update a field |
* No Sharing Rules should be configured for the objects (need to be synchronized) through which the user permissions can be revoked.
* User must have the 'write permission' of the entities that are mapped in the **Relationship Configuration** setting of space.vars.SITENAME.
### Custom field configuration
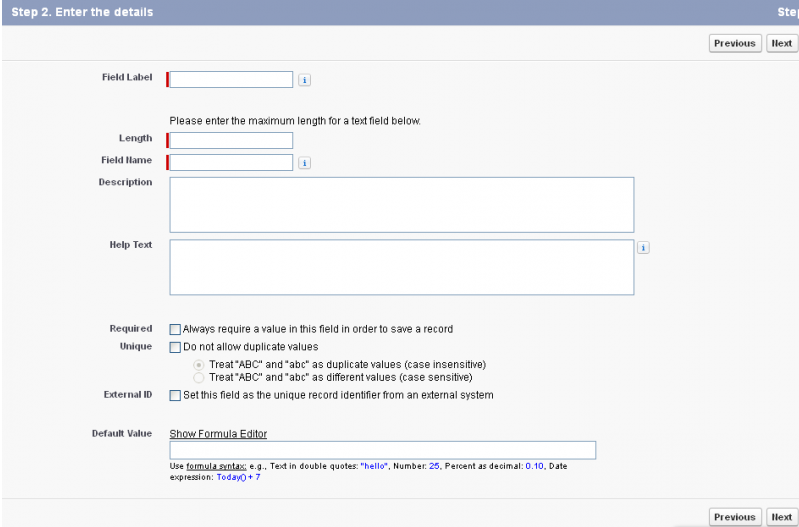
space.vars.SITENAME requires one special field to be defined on the entity that is being synchronized. These must be set up so that space.vars.SITENAME can track the integration status of each item:
| **Property Name** | **Type** | **Size** |
| ----------------- | -------- | -------- |
| OH\_Last\_Update | Text | 255 |
For more details on adding custom fields, refer to [Custom Field](#custom-field) in appendix.
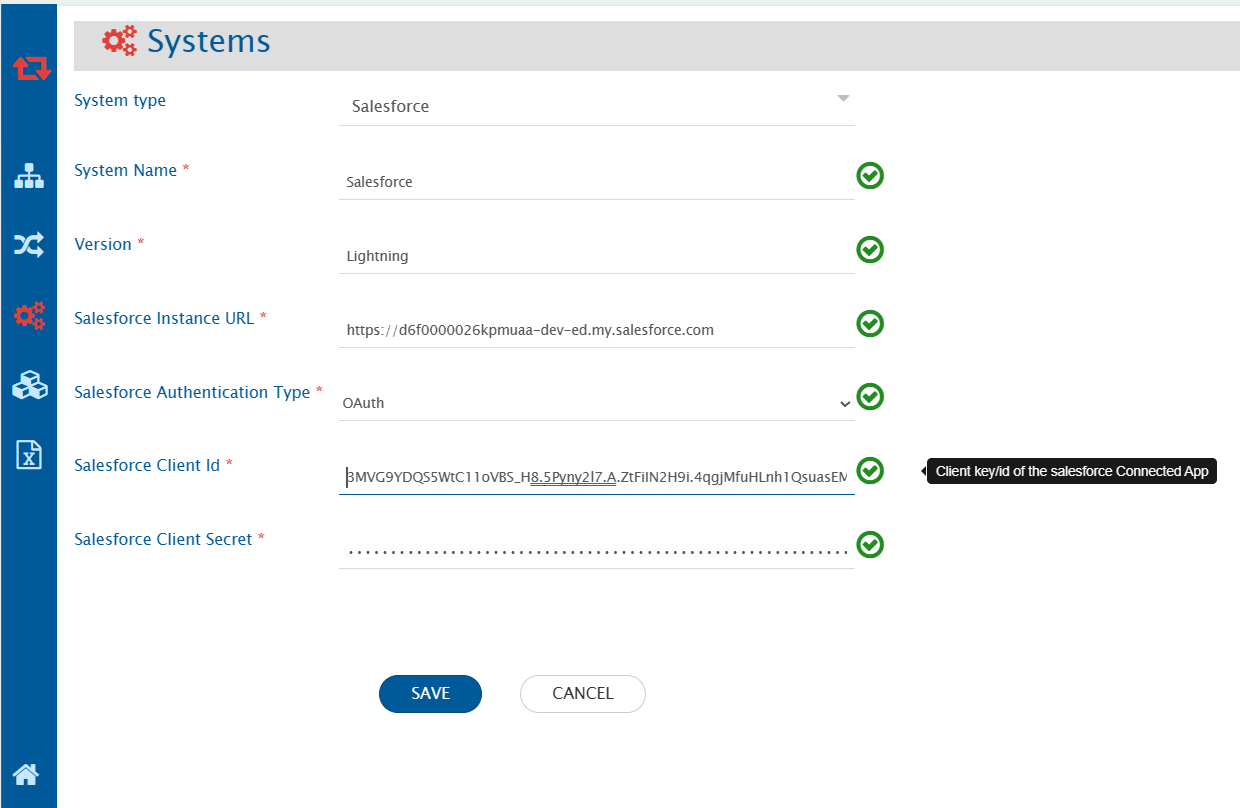
## System Configuration
Before you start with the integration configuration, you must first configure Salesforce.
Click [System Configuration](https://docs.opshub.com/v7.216/integrate/configure-integrations/system-configuration) to learn the step-by-step process to configure a system.
Refer to the screenshot below:
| **Field Name** | **When is the field visible** | **Description** |
| ---------------------------------- | ----------------------------- | ---------------------------------------------------------------------------------------------------------------------------------------------------------------------------------------------------------------------------------------------------------------------------------------------------------------------------------------------- |
| **System Name** | Always | Provide a name to the Salesforce system |
| **Version** | Always | Provide the version for the Salesforce system. The version can be either Lightning or Classic |
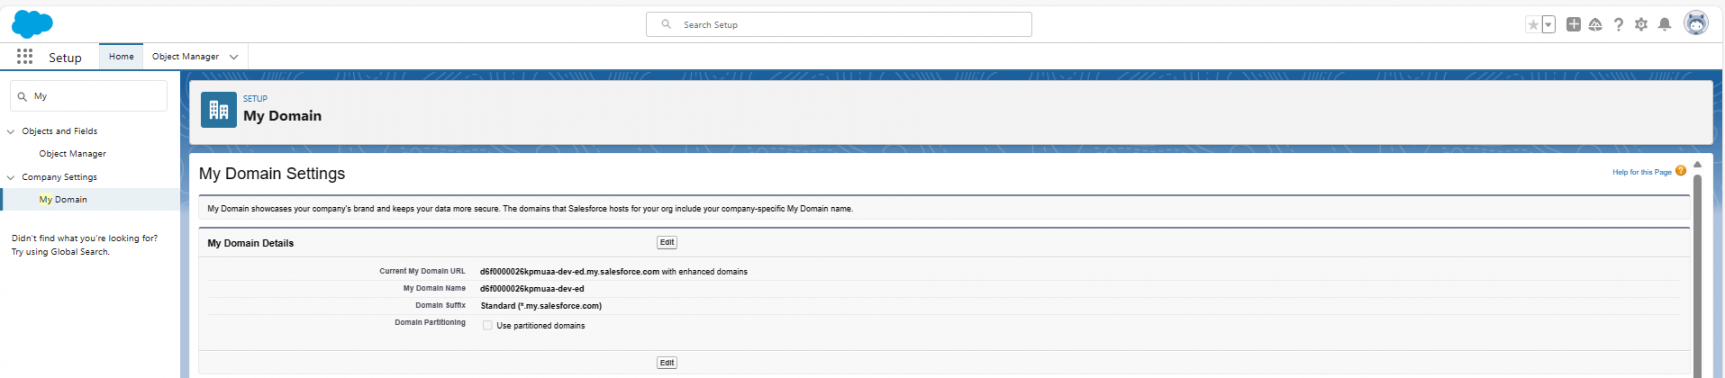
| **Salesforce Instance URL** | Always | Set the URL of your Salesforce instance
Format:
To learn how to get the domain name URL, go to Get MyDomain Name URL
|
| **Salesforce Authentication Type** | Always | Select Salesforce Authentication Type as per your requirement. There are two options to choose from:
1. Basic Authentication
2. OAuth Authentication (To learn how to enable OAuth Settings in Salesforce System, go to Steps to enable OAuth settings in Salesforce)
|
| **Salesforce Username** | Basic Authentication | Enter Username. User must have administrator privileges to use Salesforce API |
| **Salesforce User Password** | Basic Authentication | Enter password of the user added above. The value for password must be in the format of password+security token(To learn how to get the security token, click [here](#get-security-token)) |
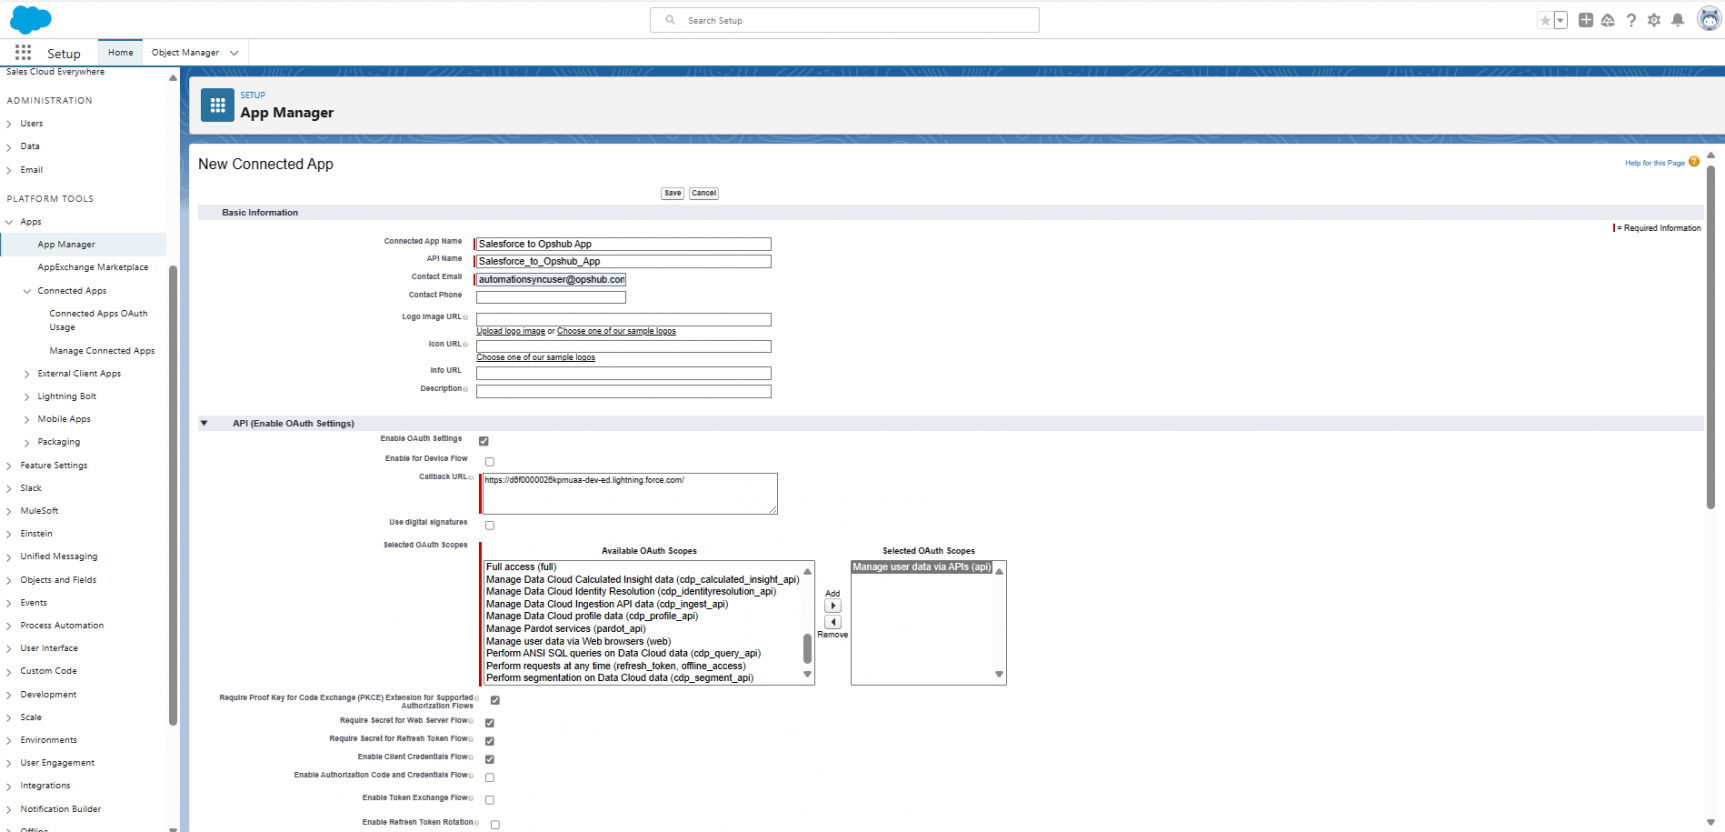
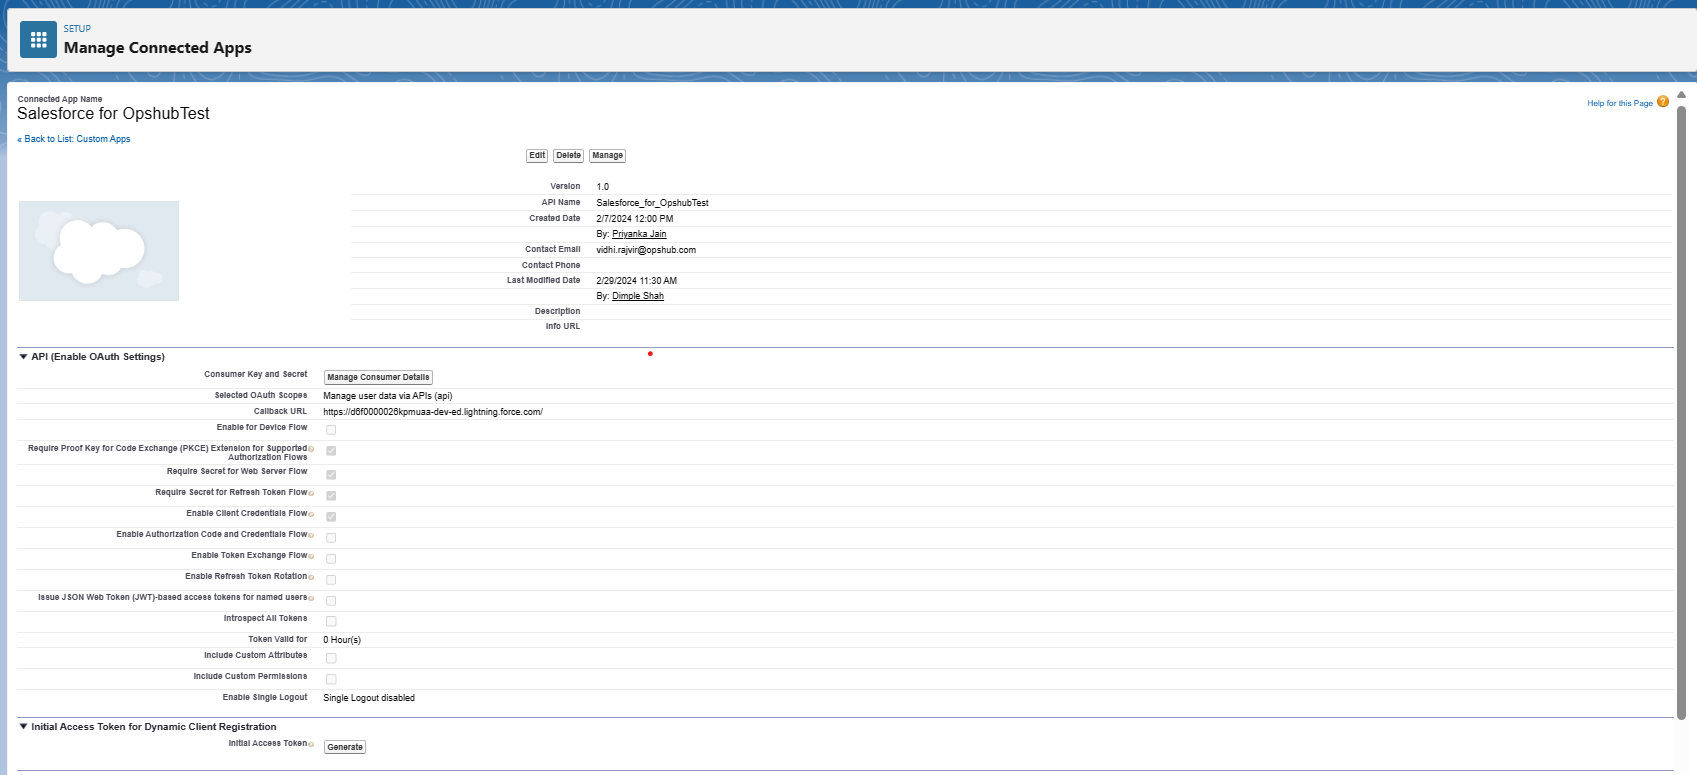
| **Salesforce Consumer Key** | OAuth Authentication | Enter Consumer Key of the user. To learn how to get the Consumer Key in Salesforce system, click [Get Client Id/ Consumer key and Client Secret for user in Connected APP](#steps-to-get-consumer-key-and-consumer-secret-for-user-in-connected-app) |
| **Salesforce Consumer Secret** | OAuth Authentication | Enter Consumer Secret of the user added above.To learn how to get the Consumer Secret in Salesforce system, click[Get Client Id/ Consumer key and Client Secret for user in Connected APP](#steps-to-get-consumer-key-and-consumer-secret-for-user-in-connected-app) |
If the system is deployed on HTTPS and a self-signed certificate is used, import the SSL Certificate. Click [Import SSL Certificates](https://docs.opshub.com/v7.216/getting-started/installation/ssl-certificate-configuration) to learn more.
## Mapping Configuration
Map the fields between Salesforce and the other system to be integrated to ensure that the data between both the systems synchronizes correctly. Click [Mapping Configuration](https://docs.opshub.com/v7.216/integrate/configure-integrations/mapping-configuration) to learn the step-by-step process to configure mapping between the systems.
### Configure Assignment Rules from Field Mapping
* When Salesforce is your target system, you can specify whether to use Assignment Rule from field mapping by specifying an XSLT Attribute in the field mapping XSLT. To read about Assignment Rules in Salesforce, refer .
* Assignment Rules can be configured and used for Account, Case and Lead entity type and will be used at the time of creating or updating an entity in Salesforce or when Salesforce is your target system.
* If this attribute is not given, then by default the active Assignment Rule will be applied on any create or update performed on Account, Case and Lead. This is the default Salesforce behavior.
* In case you do not want to apply any Assignment Rule at the time of create or update, then you can use the advanced mapping to either disable the Assignment Rule or use a specific Assignment Rule ID.
* Here is an example how you can set Assignment Rule input from field mapping. Consider you have mapped the Owner ID field, then your default field mapping for Owner ID would be something like:
```xml
```
* Add an XSLT attribute in the tag with name assignmentRuleHeader and input value to this attribute. Value can be either 'TRUE', 'FALSE' or a specific Assignment Rule ID. To get an Assignment Rule ID \* for an Assignment Rule, refer [Get Assignment Rule ID](#get-assignment-rule-id). This attribute is only used when Salesforce is a target system.
* Here is a sample XSLT:
#### Sample XSLT
```xml
```
* If you want to assign the value of this attribute according to some custom logic, then you can refer section to [Write Custom logic to configure Assignment Rules](#write-custom-logic-to-configure-assignment-rules).
### Configure Post As Comment
* Two types of **Posts** are available in Comment mapping configuration:
1. Private Text Post: This includes posts having visibility to only **Internal Users**.
2. Public Text Post: This includes posts having visibility to **All Users**.
### Mapping for Soft Delete Configuration
* When Salesforce is the target system, the Soft delete operation is performed by default in the synchronization of the [Source Delete event](https://docs.opshub.com/v7.216/integrate/advanced-sync-scenario/source-delete-synchronization).
* After the Soft Delete operation is performed by space.vars.SITENAME in Salesforce, the entity will be deleted in Salesforce. The deleted entity goes to the "Recycle Bin".
* To only enable the logical delete operation in the target, "OH Soft Delete" field shall be mapped with the default value "No" in the Delete Mode mapping.
## Integration Configuration
Set a time to synchronize data between Salesforce and the other system to be integrated. Also, define parameters and conditions, if any, for integration. Click [Integration Configuration](https://docs.opshub.com/v7.216/integrate/configure-integrations/integration-configuration) to learn the step-by-step process to configure integration between two systems.
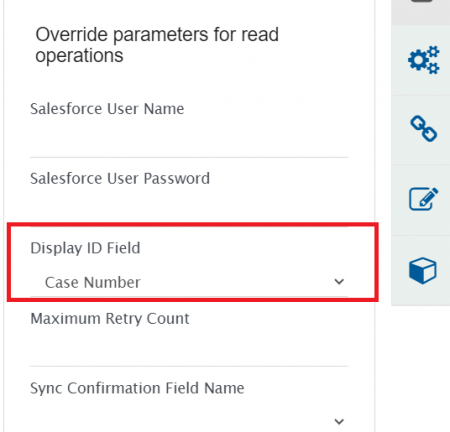
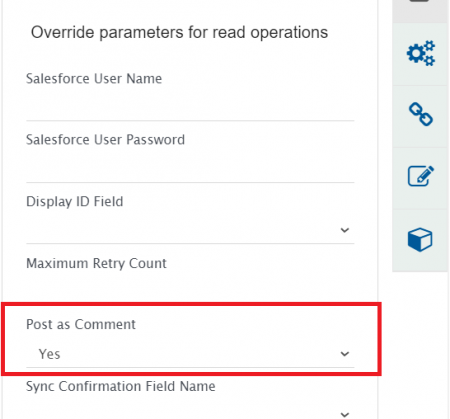
### Entity Level Advance Configuration
**Display ID Field:**
* For the Salesforce entity, user can select the field (considered as display id in Salesforce UI) from the dropdown menu.
* The above selected field value is considered as a display id in space.vars.SITENAME's sync report. For example, for **Case** entity, user can select **Case Number** in Display ID Field as it is unique and is considered as display id in Salesforce UI.
* If the field is not selected in the Display ID Field, the Salesforce entity's internal id (which is a part of the entity URL) will be visible in space.vars.SITENAME's sync report.
**Post as Comment:**
* For the Salesforce entity, the post can be synchronized as comment to the target system. To enable this feature, user needs to select "Yes" for Post as Comment field that is configured at the integration level.
## Criteria Configuration
### Query
If you want to specify conditions for synchronizing an entity between SalesForce and the other system to be integrated, you can use the Criteria Configuration feature. Salesforce query is a normal SQL type query wherein you can frame simple queries on the basis of field names. For more details on writing a query, please refer to this [link](https://developer.salesforce.com/docs/atlas.en-us.soql_sosl.meta/soql_sosl/).
### Sample Query
* Search entities with **High** Priority:
* `Priority='High'`
* Search entities with **New** Status:
* `Status='New'`
* Search entities based on a Salesforce object. For example, search entities (Cases) with Record Type as **Problem**:
* `RecordTypeId='012280000002IUU'` where `012280000002IUU` is the ID of **Problem** Record Type.
> **Note** : Please refer Salesforce document [link](https://help.salesforce.com/articleView?id=000321696\&language=en_US\&type=1\&mode=1) to learn how to get the ID of a Salesforce object (Record Type).
* Search entities created by user. You need to specify ID of the user in criteria query as shown below:
* `CreatedById='0056F000009QhnoQAC'`
> **Note**: User's ID will be available in the URL when you open user's profile page in Salesforce. Visit [link](https://help.salesforce.com/articleView?id=rss_user_profile.htm\&type=5) to learn how to open the user profile.
* Search entities with multiple criteria:
* `Priority='High' and Status='New'`
### Target Lookup Configuration
Provide Query in Target Search Query field to be able to search the entity in Salesforce when it is the target system. Go to Search in Target Before Sync section on Integration Configuration page to learn in detail about how to configure the Target Lookup functionality. The Target LookUp configuration is similar to the Criteria configuration where in the target search query field, you can provide a placeholder for the source system’s field value between ‘@’ and '@'. Refer to the examples below:
#### Sample Query
* Target Lookup Query for the constraint on a **single field**: Name = @Title@ **Description:**\
It represents the query, which will select only those entities whose "Name" field value is same as the source system's "Title" field value.
* Target Lookup Query for the constraint on **multiple fields**: (Status = @Status@ and Priority = @Priority@) **Description:**\
It represents the query, which will select only those entities whose "Status" field value is same as source system's "Status" field value. Similarly, the "Priority" field value should be same as the value of the source system's "Priority" field value.
## Known Behavior and Limitations
### Post as Comment sync
* Post and Post replies (i.e., post comments) will be sync as separate comments to the target system.
* The Post is supported as normal text. Hence, the formatting, user mention and inline images is not supported.
* Salesforce as the source system:
* Supported posts: **Text** post (TextPost), Post replies (TextComment), and Post with attachment (ContentPost).
* To sync the post attachment, it is required to enable attachment mapping space.vars.SITENAME.
* If a Post reply is edited after being synced, an additional field update is necessary to sync the edited reply as a new comment.
* Salesforce as the target system:
* Supported posts: **Text** post.
* The Post with attachment is not supported. In this case, the attachment will be added to the Salesforce object, however, it will not be referred in Post.
* Salesforce's Chatter API has a limit of 2000 requests per hour and per user. Hence, Integrations that has enabled **Post as Comment** field, would come to a pause after reaching the request limit.
### Remote Link
* The remote link URL contains the URL of the Classic version only irrespective of any Salesforce version(Classic or Lightning).
### Field with Reference datatype
* If the **Reference field** is referring to multiple entities of Salesforce, then only the first referred entity will be supported as **Link**.
* For example, if the **Related field** refers to the Enhancement and User Story entities, then only Enhancement will be supported as the **Link** in space.vars.SITENAME.
### Chatter Feed types
* space.vars.SITENAME supports only **Post** type from all Chatter feed types.
### Inline Image Sync
* To enable Inline Image Sync in space.vars.SITENAME, you need to enable the **Content Deliveries and Public Links** Settings in your Salesforce Instance. The steps to enable **Content Deliveries and Public Links** is mentioned in [Steps to enable Content Deliveries and Public Links in Salesforce](#steps-to-enable-content-deliveries-and-public-links-in-salesforce)
* Click here to learn how to enable Content deliveries and Public links in the Salesforce system\*\* [Steps to enable Content Deliveries and Public Links in Salesforce](#steps-to-enable-content-deliveries-and-public-links-in-salesforce)
## Appendix
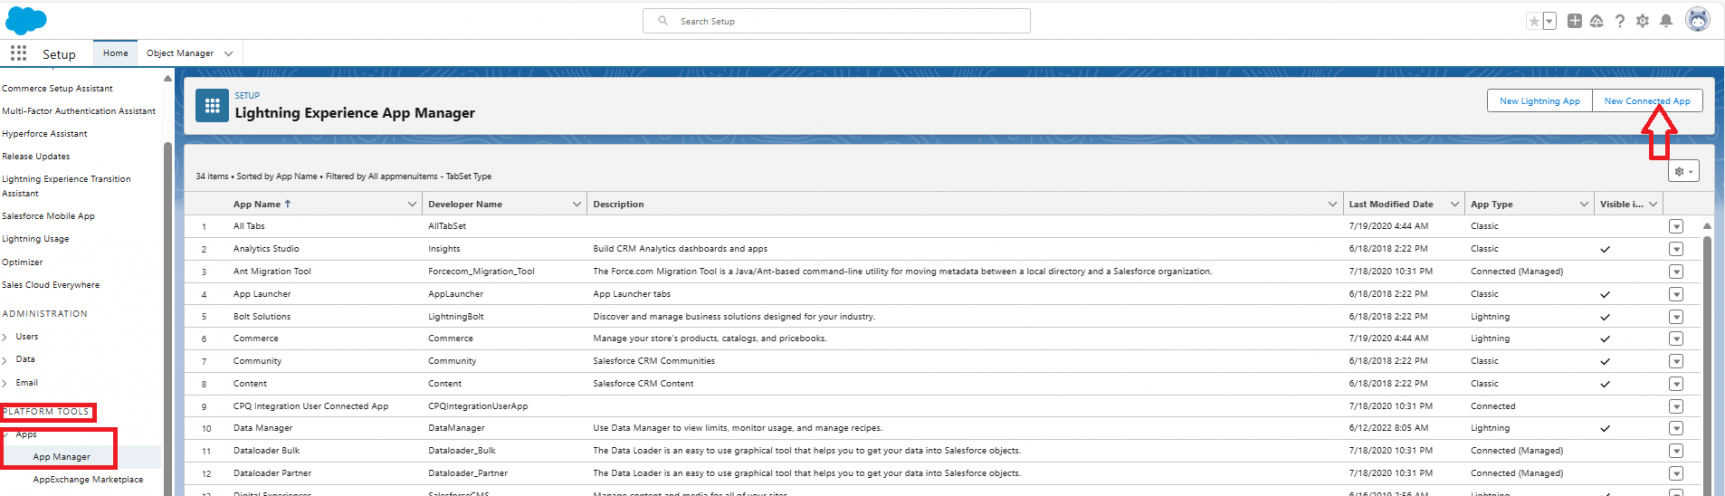
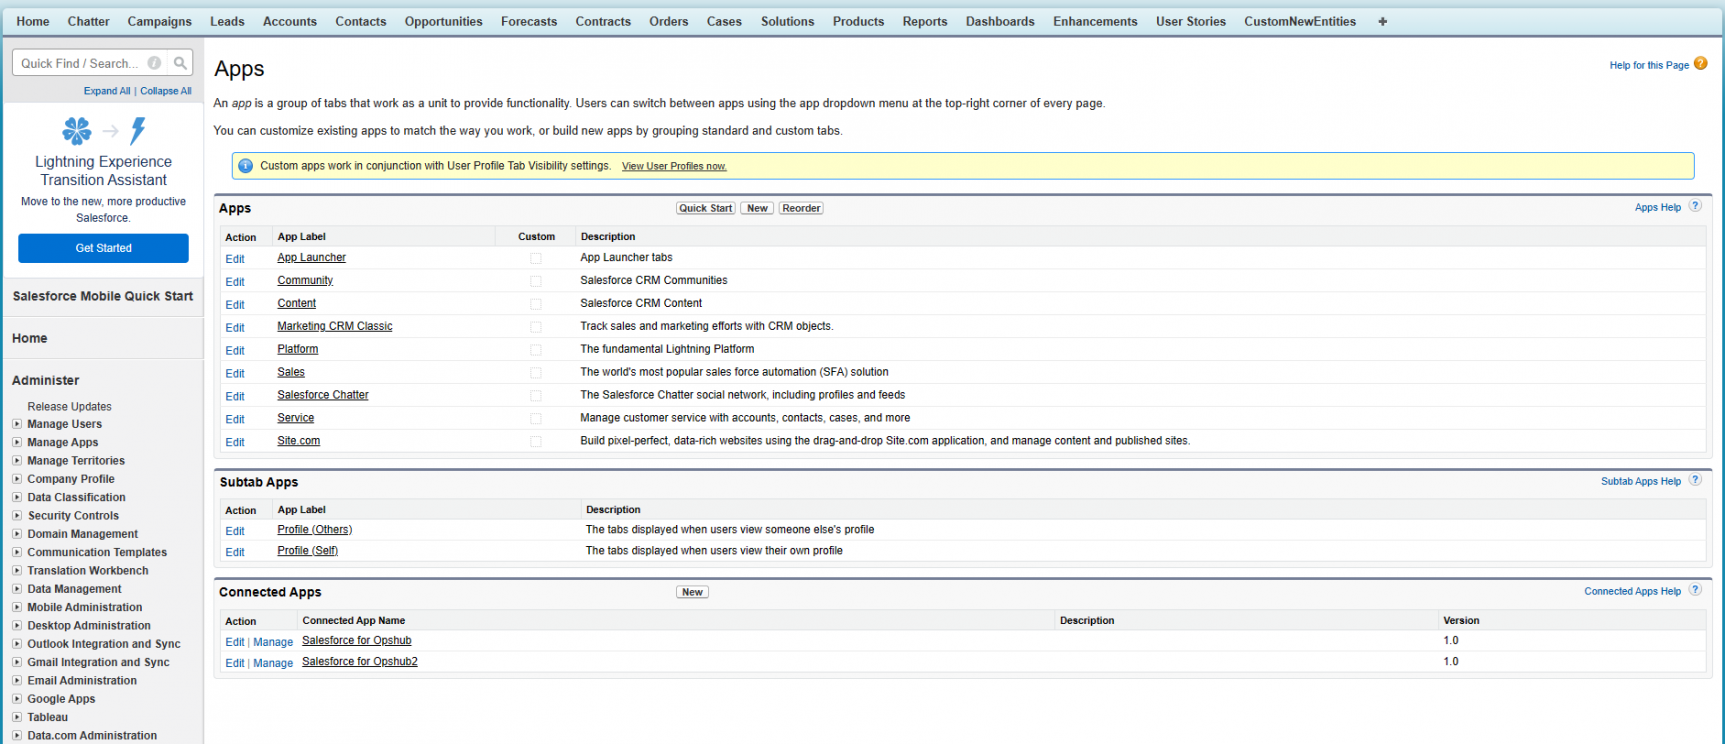
### New User
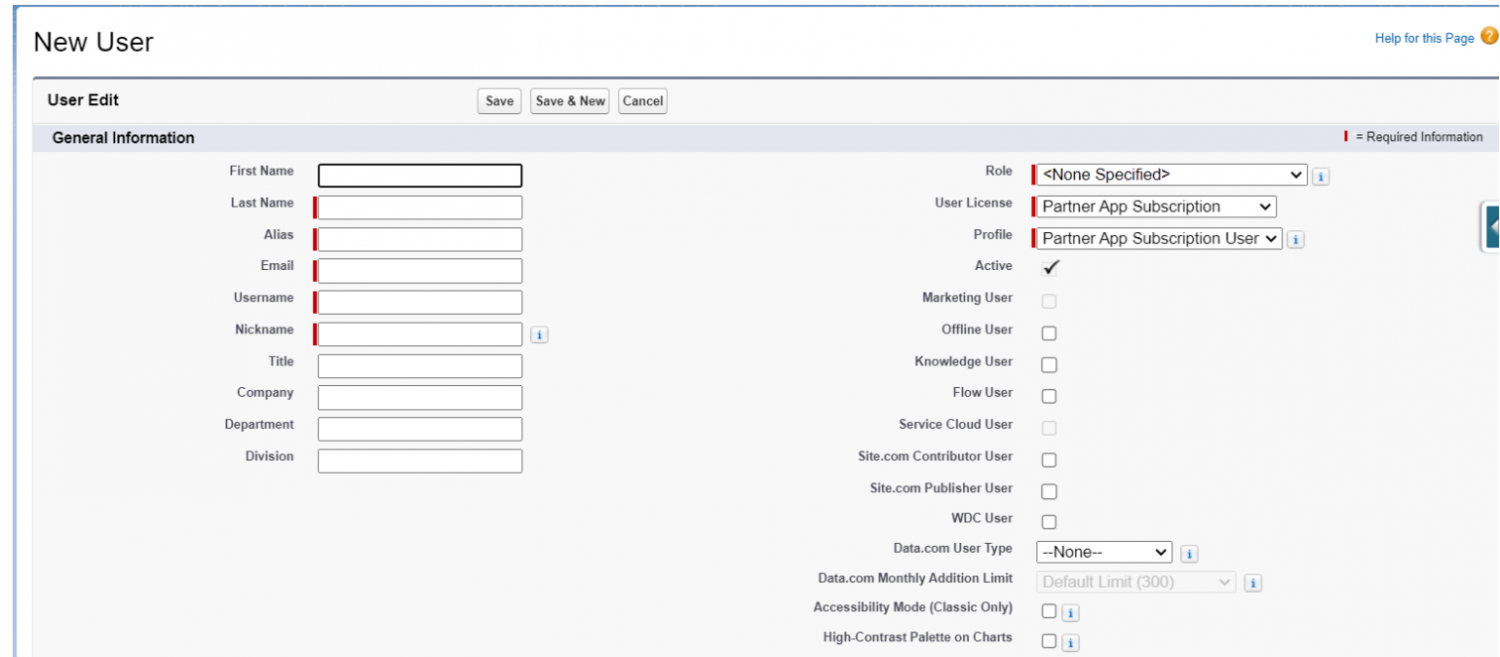
* Log into Salesforce.
* Go to **Setup** -> **Users** -> **Users**.
* Click **New User** and provide the required information.
* Select a **User License**. The user license determines which profiles that are available to the user.
* Select a **Profile**, specifing the user’s minimum permissions and access settings.

space.vars.SITENAME with Oauth authentication type.
### Steps to enable Content Deliveries and Public Links in Salesforce
* Log into Salesforce.
* Go to **Setup** -> type in **Quick Find** textbox -> **Content Deliveries and Public Links**
* Click **Edit** and enable the "Content Deliveries" feature and "Public Links".
* Content Deliveries and Public Links convert files into an online format available via a link, which you can send to people inside or outside your organization.
* **Select Password protection** configuration as **optional** and default value as **OFF**.\
Refer to the screenshot below: